
Guia Prático do ZimaBoard 2 de Duplo Uso: O Meu Servidor + Consola de Jogos Retro


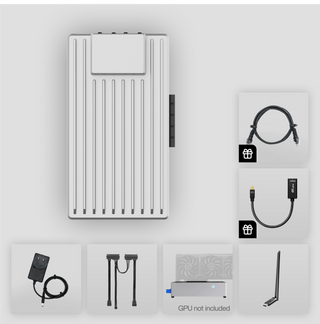
I. Seleção de Equipamento e Requisitos Principais
Sou um desenvolvedor backend. O servidor remoto que alugava anteriormente estava desatualizado e não tinha desempenho suficiente, deixando de satisfazer as minhas necessidades de self-hosting. Por isso, comprei um Zimaboard 2 1664 com objetivos claros: primeiro, construir um servidor doméstico self-hosted totalmente configurado, com backup, para implantação de aplicações, gestão de dados e conectividade remota; segundo, sem afetar o uso principal do servidor, aproveitar o desempenho ocioso do hardware para transformá-lo numa consola de jogos retro plug-and-play, alcançando uma funcionalidade dupla que equilibra necessidades técnicas práticas com entretenimento diário.
II. Processo de Configuração do Servidor Self-hosted
Seleção e Instalação do Sistema
Após adquirir o equipamento, experimentei primeiro o ZimaOS que acompanha o Zimaboard 2. Era fácil de operar e conveniente para acesso remoto, mas a natureza imutável do sistema NAS limitava severamente as implantações de aplicações posteriores. Com base nos meus hábitos de uso, optei por mudar para o Fedora Server — o mesmo sistema do meu servidor antigo, oferecendo maior compatibilidade. Durante a instalação, apenas substituí a ferramenta de criação do disco USB de arranque do tutorial. Usando a WebUI local integrada do Fedora Server e o terminal, completei facilmente os passos iniciais antes da configuração SSH e do reforço de segurança. A instalação decorreu muito bem.

Configuração de Armazenamento e Backup
Para garantir um backup adequado dos dados do servidor, utilizei dois discos rígidos sobressalentes e formatei-os como sistemas de ficheiros BTRFS. Este sistema está integrado no kernel Linux, suporta snapshots nativamente e é altamente estável, correspondendo perfeitamente às minhas necessidades de backup para o servidor self-hosted. Também fornece uma base de armazenamento fiável para a operação estável do servidor.
Implantação dos Serviços Principais
Construi um serviço self-hosted completo no servidor usando Docker para satisfazer as necessidades diárias: Jellyfin como servidor multimédia para gestão unificada dos meus recursos pessoais de áudio e vídeo; Filebrowser para criar uma drive de nuvem privada com acesso remoto a ficheiros a qualquer hora e lugar; e Karakeep para gerir os meus favoritos e notas, facilitando o trabalho e estudo. Reservei também espaço para implantar servidores Minecraft e RustDesk, para entretenimento online futuro com amigos e para ajudar familiares com problemas em computadores e dispositivos móveis.
Configuração de Rede e Monitorização
Para proxy reverso, mudei do habitual Traefik para Godoxy, combinando-o com Tailscale para interligar o servidor local com o servidor remoto original, evitando a exposição da rede doméstica. Além disso, o Godoxy inclui um painel de monitorização integrado, permitindo-me ver em tempo real o estado da CPU, memória, temperatura, disco e outros do servidor, melhorando significativamente a eficiência da gestão do servidor.

III. Retrofit da Consola de Jogos Retro: Arranque/Paragem Sob Demanda, Sem Interferência no Servidor
Três Princípios Centrais do Retrofit
Para garantir que as funções de jogo e servidor não interfiram entre si, defini três princípios centrais para o retrofit: ① Não instalar um ambiente de trabalho completo para evitar consumo de recursos do sistema e garantir operação leve do servidor; ② Arrancar e parar as funções de jogo sob demanda, terminando automaticamente todos os processos relacionados quando não estiverem em uso para evitar desperdício de desempenho do hardware; ③ Garantir operação simples para que mesmo colegas de casa sem conhecimentos técnicos possam usar de forma independente, sem a minha ajuda.
Ideias Centrais e Combinações de Ferramentas
A ideia central de toda a transformação não é complexa. Aproveitei ferramentas nativas do Linux e software de jogos open-source para conseguir o arranque e paragem automáticos do serviço de jogos acionados pelo plug/unplug do HDMI: ligar o cabo HDMI da TV inicia automaticamente a interface gráfica do jogo; desligar o cabo HDMI termina imediatamente todos os processos do jogo, revertendo para um estado puro de servidor — totalmente automatizado, sem necessidade de operação manual. As ferramentas selecionadas têm funções bem definidas e são todas produtos maduros e open-source, fáceis de configurar:
- Regras udev + scripts Shell personalizados: responsáveis por detetar o estado de plug/unplug do cabo HDMI e disparar os comandos correspondentes de arranque/paragem do serviço;
- Serviço systemd: gere o arranque ordenado e a terminação graciosa das sessões de jogo, prevenindo que processos remanescentes afetem o servidor;
- Gamescope: um compositor Wayland leve que otimiza o dimensionamento do ecrã do jogo, permitindo que jogos antigos se adaptem perfeitamente à resolução 1080P da TV;
- ES-DE + Retroarch: ES-DE serve como frontend da biblioteca de jogos, permitindo gestão por categoria de consola e captura automática de capas e descrições; Retroarch gere vários emuladores de consolas retro e configura automaticamente os comandos, tornando-o muito fácil de usar.
Passos Práticos de Configuração
1. Configuração de Permissões: Adicionei o utilizador normal que executa o serviço de jogos aos grupos input, video, audio e seat, e ativei o serviço seated para garantir que as sessões Wayland pudessem ser criadas normalmente, preparando as permissões para a funcionalidade de jogo.
2. Configuração de Detecção e Disparo: Criei um ficheiro de regras udev, definindo as condições de deteção do plug/unplug do HDMI, disparando o meu script shell personalizado. O script inclui lógica para determinar o estado da ligação HDMI, permitindo que o sistema inicie e pare automaticamente o serviço de jogo systemd a nível de utilizador conforme o estado do HDMI.
3. Configuração do Serviço de Jogo: Criei um ficheiro de serviço systemd a nível de utilizador, definindo o comando principal para o Gamescope iniciar o ES-DE, e configurei uma lógica dupla de "terminação graciosa + terminação forçada" para evitar que processos anormais de jogos afetem a operação do servidor.
4. Instalação de Dependências: Instalei todos os drivers de hardware e software necessários de uma só vez, incluindo gráficos integrados Intel, drivers de gamepad e software principal de jogos como Gamescope, Retroarch e ES-DE, garantindo perfeita compatibilidade de hardware e software.
5. Ativação da Configuração: Recarreguei as regras udev e... Com o serviço systemd instalado, a modificação da consola de jogos retro está agora completa, e a funcionalidade de jogo está totalmente automatizada para arranque e paragem.
IV. Otimização e Depuração: Equilibrar Experiência de Jogo e Estabilidade do Servidor
Otimização Dedicada à Experiência de Jogo
Para garantir uma experiência de jogo retro mais fluida, otimizei especificamente a configuração para jogos Wii/NGC: abandonei correr o emulador Dolphin via Retroarch, optando por operação independente para reduzir a sobrecarga de desempenho da camada Libretro; ajustei o ficheiro de configuração do Dolphin para otimizar a proporção e a lógica de renderização do jogo; e atualizei os parâmetros de arranque do Gamescope, ativando a escala FSR para oferecer qualidade de imagem ideal em TVs 1080p. Os testes mostraram que a configuração otimizada manteve o uso da GPU entre 70% e 80%, e num ambiente interior a 20℃, a temperatura máxima do dispositivo foi apenas 55℃. Com o ventilador oficial, a refrigeração foi totalmente adequada, garantindo jogabilidade fluida sem afetar o servidor por sobreaquecimento.

Técnicas Práticas de Depuração
Durante o processo de modificação, compilei também um conjunto de técnicas simples e eficientes de depuração. Estas técnicas não só resolvem problemas encontrados durante a modificação, como também se adaptam a mais emuladores não geridos pelo Retroarch: usar o comando journalctl para ver logs de eventos udev em tempo real, disparar manualmente eventos de alteração do estado HDMI e testar a eficácia das regras; remover temporariamente as regras udev, ligar ao dispositivo via SSH, iniciar manualmente o programa de jogo e personalizar a configuração do comando; após a depuração, restaurar as regras para voltar ao modo de uso automatizado. A operação é simples e eficiente.
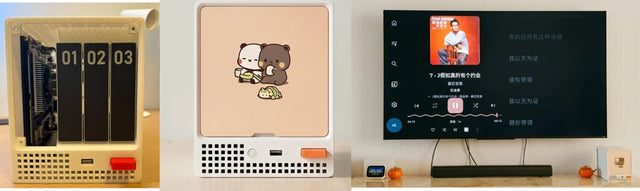
V. Resultado Final: Dupla Funcionalidade, Explorando Totalmente o Potencial do Hardware
Após uma série de configurações e modificações, o meu Zimaboard 2 alcança perfeitamente as funções duplas de servidor e consola de jogos retro: no uso diário, é um servidor self-hosted de baixo consumo e estável, gerindo silenciosamente tarefas essenciais como implantação de aplicações, backup de dados e acesso remoto. O desempenho do chip Intel N150 é perfeitamente adequado à minha carga de trabalho diária. Durante o tempo de inatividade, basta ligar o cabo HDMI da TV ao dispositivo para iniciar automaticamente a interface de jogos, permitindo desfrutar de clássicos retro como PS1 e Wii, com suporte até para multijogador local. Desligar o cabo HDMI termina imediatamente todos os processos de jogo, revertendo para modo servidor puro, sem interferência entre ambos.


Esta configuração e modificação do Zimaboard 2 permitiram-me explorar totalmente o potencial do hardware e voltar a experienciar a flexibilidade do sistema Linux e o encanto da tecnologia open-source. Uma pequena placa de desenvolvimento nunca está limitada a satisfazer apenas uma única necessidade; desde que a combine com os seus próprios cenários de uso e tenha coragem para experimentar, pode libertar um valor muito maior.
Junte-se à Comunidade para Desbloquear Mais Conteúdos Úteis!
Bem-vindo à comunidade IceWhale no Discord! Vamos lançar mais tutoriais detalhados de configuração, estudos de caso de utilizadores e atualizações de produtos para o ajudar a navegar facilmente no mundo digital e encontrar a plataforma de hardware perfeita para cada paixão.

Produtos recomendados
Centro de Campanhas Zima
Mais para Ler
Como um Pequeno NAS se Tornou um Arquivo Familiar com o ZimaOS
Uma verdadeira história de NAS doméstico sobre a preservação de registos médicos, fotos de família, música e memórias do dia a dia — e...
Dia da Liberdade do Software 2026: As Melhores Aplicações Open-Source para Auto-Hospedar em Casa
Explore ferramentas úteis auto-hospedadas para armazenamento, backup de fotos, streaming de media, documentos e automação doméstica num servidor fiável em casa.

Dia Mundial da Fotografia: Como Fazer Backup e Organizar uma Vida de Fotografias
Reúna fotos dispersas, crie um arquivo simples, automatize backups, verifique a recuperação e saiba quando o armazenamento centralizado se torna vantajoso.


