
Hardware Customization for Your NAS Server: The Ultimate 3D Printing and Modding Guide


Off-the-shelf enclosures are designed for the average use case, and your homelab setup probably isn't average. A single board server sitting bare on a shelf, struggling with heat or taking up awkward desk space, is a problem that a $5 spool of filament and an afternoon can solve. Hardware modding has become one of the most active areas in the homelab world, and for good reason: the results are practical, the learning curve is manageable, and the payoff lasts for years.
Why Your NAS Server Deserves a Custom Enclosure
Most compact home servers ship without a case, or with a minimal aluminum shell that handles passive cooling adequately but ignores everything else: cable routing, drive mounting, rack integration, and physical aesthetics. For a device running 24/7, those details matter more than they seem at first.
A custom enclosure lets you solve problems the manufacturer never prioritized. Vibration-reducing HDD/SSD stand, front-panel access to USB ports, clean SATA cable management, and space for an added fan are all things that 3D printing handles cleanly. Beyond practicality, a modded NAS server sits better in a proper homelab rack, stacks more predictably in a cluster, and simply looks less like a circuit board duct-taped to a power brick.
Modern single-board servers built on x86 architecture also support PCIe expansion in ways that most ARM-based alternatives simply don't, which means your modding ambitions don't have to stop at the case.
How to 3D Print a NAS Server Case: Materials, Tools, and First Steps
Printing an enclosure for a home server is a different challenge from printing decorative objects. The case will live near a heat source, carry real weight from drives, and need dimensional accuracy to align port cutouts with the board's I/O panel. Breaking the process into clear steps makes it far less overwhelming.

Step 1: Choose the Right Filament
PLA is the easiest filament to print, but its glass transition temperature sits around 55–65°C depending on the brand, which is uncomfortably close to the temperatures a loaded NAS can reach inside a sealed enclosure. For anything housing an active system, PETG is the practical default: it resists heat up to around 80°C, handles humidity reasonably well, and prints without the warping issues that come with ABS. For high-ambient-temperature environments or builds with limited airflow, ASA raises the heat tolerance further (around 95°C) and offers better UV resistance than either PLA or PETG, making it a solid choice for garage or workshop setups.

Step 2: Take Accurate Board Measurements
Before touching CAD software, measure your board carefully: overall length and width, the position of each port relative to the board edge, mounting hole locations, and the height of the tallest component (usually the heatsink or capacitors). These dimensions are the foundation of every cutout and standoff in your design. A 0.5mm error at this stage becomes a misaligned Ethernet port that can't be fixed without reprinting the entire shell.
Step 3: Design for Airflow
Even passively cooled boards need air movement once enclosed. Every vent in needs a vent out, ideally positioned to create a natural convective path from the board's heat source upward. Honeycomb vent patterns outperform solid slots by providing better structural integrity at the same open area. For boards with passive heatsinks, leave a minimum 10mm clearance above the heatsink surface inside the enclosure. If you plan to add active cooling, positioning intake vents low near the CPU area and exhaust vents on the opposite upper face gives you the most effective thermal path.
Step 4: Print a Test Frame First
Before printing the full enclosure, print just the I/O face or a corner section to verify port alignment. A partial test print takes 20 minutes and catches dimensional errors that would otherwise waste an hour of filament. Once the test piece fits cleanly, proceed with the full print.
Best Ways to Mod Your NAS Server: From Rack Mounts to PCIe Expansion
Once you're comfortable with a basic enclosure, the modding space opens up considerably. The homelab maker ecosystem has developed a wide range of practical upgrades, spanning physical form factor changes and functional hardware additions alike.
Rack and Cluster Mounts
The 10-inch mini rack format has become a popular choice for single-board server clusters. Printed rack trays keep the footprint compact enough that a 4-node cluster fits in under 2U of rack space. Cluster frames that stack multiple boards vertically with shared airflow paths are another active area of community design, and several proven models are freely available to download and print.
Active Cooling Additions
Passive cooling handles light and medium workloads well, but sustained transcoding, Docker container stacks, or Proxmox VM clusters push CPU temperatures into ranges where a fan makes a measurable difference. On boards that expose a CPU_FAN header, a 60mm fan mounted to the enclosure lid and wired directly to that header gives you temperature-proportional speed control. USB-powered fans are a simpler no-soldering alternative, though they run at a fixed speed without thermal feedback.
PCIe Expansion Modding
Boards with a PCIe slot open up a different category of mods entirely. Community builds have demonstrated 10G NIC upgrades, NVMe adapter cards, and external GPU brackets for local AI inference workloads. Printing a bracket that keeps the PCIe card mechanically stable, rather than relying solely on the slot connector, is worth the extra design effort, particularly in setups that get moved around.
Wall Mounts and VESA Brackets
Not every homelab lives in a rack. Printed VESA-compatible mounts and pegboard adapters let single-board servers disappear behind monitors or onto workshop walls, keeping desk space clear while staying physically accessible.
Community Resources: Free 3D Models, CAD Tools, and Real Homelab Builds
Hundreds of 3D enclosure designs have already been built, tested, and shared freely across the maker ecosystem. Spending ten minutes browsing before opening CAD software often saves hours of design work.
Where to Find Models
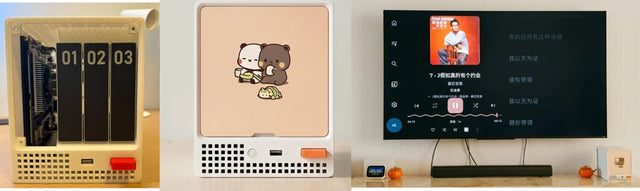
Printables and MakerWorld are the two most active platforms for single-board server designs. On Printables, user heroeant published a modular storage enclosure for ZimaBoard that supports mixed 2.5" and 3.5" drive configurations with hidden SATA cable routing. MakerWorld hosts a ZimaBlade NAS enclosure with an optional 60mm fan mount by hsavior, a cluster frame by SabiTech, a fan guard for ZimaBoard 2 by AleMaker3D, and a 10-inch rack tray with dual NVMe PCIe support by DesignBot. Thingiverse carries older designs worth checking for port cutout dimensions, including a ZimaBoard case with an integrated SSD mounted by TechsPassion.

CAD Software for Beginners
Tinkercad (browser-based, free) is the fastest path to a functional first enclosure design. FreeCAD is the open-source option with proper parametric modeling, suitable once you're past the basics. Fusion 360 remains the most capable tool in this category, free for personal use, with strong tutorial support specifically for enclosure and bracket work.
Forums Worth Bookmarking
The IceWhale Community Forum has hosted 3D printing design contests with hardware prizes, producing a wave of enclosure and rack designs still actively downloaded today. The accompanying Discord is a practical space for getting dimensional feedback before committing filament to a new design.
How to Mod Your NAS Server Safely: Heat, Power, and ESD Risks
Hardware modding comes with real risks that are easy to overlook when the focus is on the creative side of a project.
Thermal Management
Enclosing a previously open board changes its thermal behavior significantly. Always monitor CPU and drive temperatures after installing a new enclosure using tools like lm-sensors on Linux, or the monitoring dashboard built into your NAS operating system. If idle temperatures climb more than 10–15°C above pre-enclosure baselines, revisit your vent design before leaving the system running unattended.
Thermal paste on the CPU heatsink contact surface is also worth checking on any board that has been in service for more than two years. Reapplication takes five minutes and regularly recovers 5–10°C on older hardware.
Electrical Safety and ESD Protection
Static discharge can kill a board instantly and silently. Before handling any bare PCB, ground yourself with a wrist strap connected to an unpainted metal surface, or at a minimum, touch a grounded metal object before picking up the board. Work on a hard, non-carpeted surface and avoid synthetic clothing.
For any power modifications, including custom power injection, barrel connector adapters, or splitter cables, verify voltage with a multimeter before connecting to the board. The standard input for most compact home servers is 12V DC; a mismatched adapter feeding higher voltage is a fast way to end the project permanently. Always confirm polarity on custom power cables before the first power-on.
Mod Once, Run Forever: Make Your NAS Server Work Harder
A well-modded home server doesn't need to be replaced just because your storage needs grow or your rack layout changes. The enclosure you print today can be revised and reprinted tomorrow. The PCIe card added for 10G networking can be swapped for something different next year. Hardware customization is fundamentally about extending the useful life of capable hardware, on your terms and your timeline.
The designs are out there, the tools are free, and the homelab community has already documented most of the hard lessons. Pick one mod, start small, and build from there. Your home server is more capable than its stock form suggests.
FAQs
Q1: Can I use 3D-printed parts inside a high-performance server rack where ambient temperatures exceed 40°C?
Yes, but material choice is critical. At these temperatures, even PETG might slowly deform under mechanical stress (creep). You should upgrade to ASA or PC (Polycarbonate). PC offers the highest heat resistance (up to 110°C) and structural rigidity, ensuring your brackets don't sag and cause short circuits or fan obstructions over time.
Q2: Will a 3D-printed enclosure increase the risk of electromagnetic interference (EMI)?
Potentially, yes. Unlike metal cases, plastic provides zero EMI shielding. While most modern SBCs are relatively resilient, you can mod your printed case by applying conductive copper foil tape or EMI shielding spray to the interior. This creates a makeshift Faraday cage, reducing interference with nearby Wi-Fi routers or sensitive audio equipment.
Q3: Is it possible to 3D print a functional heatsink for my NAS?
No. While thermally conductive filaments exist (filled with copper or graphite), their thermal conductivity is negligible compared to solid aluminum or copper. However, you can print custom air ducts (shrouds) that force airflow directly through your existing metal heatsink, which often improves cooling efficiency more than a larger heatsink would.
Q4: How do I handle the vibration of multiple 3.5-inch HDDs in a lightweight 3D-printed frame?
Incorporate "sandwich" dampening. Don't bolt HDDs directly to hard plastic. Design the mount with 2mm of clearance and use TPU (flexible filament) gaskets or rubber grommets. This decoupling prevents the mechanical hum of the drives from being amplified by the plastic shell, which acts like a guitar's soundbox.
Q5: Are there specific fire safety standards I should follow when printing electrical enclosures?
Yes, look for UL94-V0-rated filaments. Standard PETG is flammable. If you are building a high-power NAS or using custom power delivery, search for specialized "Flame Retardant" (FR) versions of ABS or ASA. These materials are self-extinguishing, significantly reducing the fire risk if a component on the board fails catastrophically.

Recommended products


Zima Campaign Hub
More to Read
How a Small NAS Became a Family Archive With ZimaOS
A real home NAS story about preserving medical records, family photos, music, and everyday memories—and the practical lessons for protecting irreplaceable data.
2026 Software Freedom Day: The Best Open-Source Apps to Self-Host at Home
Explore useful self-hosted tools for storage, photo backup, media streaming, documents, and home automation on one reliable server at home.
World Photography Day: How to Back Up and Organize a Lifetime of Photos
Gather scattered photos, build a simple archive, automate backups, verify recovery, and learn when centralized storage becomes worthwhile.


