
Storage Topology for a First Home Lab: Boot Drive, App Data, and Bulk Storage


A first home lab needs separate storage roles so reinstalling the host, rebuilding an app, or expanding capacity does not move every dataset at once.
The boot drive, persistent application state, and bulk storage have different failure, latency, and growth patterns. Treating them as one undifferentiated disk is convenient only until an update fills the root filesystem, a database competes with media files, or a capacity upgrade requires moving the operating system. A clear topology lets each layer change without redefining the others.
Assign Storage Roles Before Selecting Drive Sizes
Begin with data behavior rather than hardware labels. The system layer contains the operating system, package state, container engine, and host configuration. The app-data layer contains databases, configuration, secrets, indexes, and other persistent state. The bulk layer contains media, archives, backups, ISOs, project files, and shared household data. Cache and temporary files form a fourth disposable role.
Puget Systems recommends keeping the operating system and applications on the primary drive while separating project assets when independent restoration or reinstallation matters. That role-based storage separation transfers cleanly to a home lab even when the workload is not video editing.
For every planned service, mark which role each path belongs to, who owns it, whether it can be regenerated, how quickly it grows, and which restore operation brings it back. Drive selection should happen only after this map exposes the capacity and latency requirements.
Keep the Boot Drive Replaceable and Bounded
The boot drive should contain enough space for the operating system, logs, package updates, container images, and a controlled amount of working data. It should not become the only location for databases, family files, VM images, or application uploads simply because those defaults were easiest during installation.
LinuxBlog’s filesystem hierarchy guide explains that separate filesystems can prevent one data area from filling the root filesystem and affecting the rest of the server. That root-filesystem containment principle is the main reason to keep persistent growth outside the boot layer.
Document the host configuration, package or compose definitions, network settings, and the locations of external data mounts. The boot drive passes the replaceability test when it can be reinstalled without restoring bulk data and without guessing where application state was stored.
Place Persistent App Data on a Deliberate Low-Latency Path
Databases, indexes, account records, configuration, and small frequently updated files behave differently from large media archives. Their capacity may be modest, but high latency or inconsistent backup can make applications slow or unrecoverable. A dedicated SSD-backed path keeps this state visible and independent from disposable container layers.
Better Stack explains that Docker volumes give persistent data a lifecycle independent from the container that uses it. That application-versus-data lifecycle boundary is essential even when the home lab uses bind mounts instead of named volumes.
Use readable locations such as /srv/appdata/photo-service and /srv/appdata/database-name. Back up databases with an application-consistent method where needed, and record dependencies such as credentials, schema versions, and certificates. Do not mix cache into this path merely because both are produced by the same app.

Use Bulk Storage for Capacity-Heavy, Less Latency-Sensitive Data
Bulk storage is the appropriate home for media libraries, archives, device backups, ISO files, large project data, and other datasets whose dominant requirement is capacity. HDDs remain useful here because large sequential reads and writes do not always justify the cost of storing every byte on flash.
TechTarget’s SSD and HDD comparison explains that SSDs offer lower latency while HDDs continue to serve high-capacity storage requirements economically. That latency-versus-capacity distinction supports a topology where app state uses SSD and large replaceable or sequential data uses HDD.
| Data role | Typical medium | Main priority | Common mistake |
|---|---|---|---|
| Boot and host | SSD or NVMe | Reliable startup and updates | Allowing user data to fill the root filesystem |
| Persistent app state | SSD or protected fast tier | Low latency and consistent recovery | Leaving databases inside disposable containers |
| Bulk storage | HDD pool or large SSD pool | Capacity and predictable expansion | Using the bulk pool as the only backup copy |
| Cache and temporary work | SSD, NVMe, or bounded temporary path | Speed and easy cleanup | Backing up rebuildable data indefinitely |
The medium is not the topology by itself. The important rule is that applications see stable role-based paths while the administrator can replace the physical storage behind those paths later.
Make Mount Points and Service Startup Order Stable
A data drive that mounts inconsistently can cause an application to write into an empty directory on the boot disk. The service may appear healthy while filling the wrong filesystem. Stable identifiers and startup dependencies prevent this quiet topology failure.
LinuxBlog’s disk-partitioning guide demonstrates inspecting filesystem UUIDs and mount points instead of relying only on device names. That persistent-mount verification workflow keeps paths stable after reboots, controller changes, or additional drives.
Mount bulk and app-data filesystems before dependent containers or services start. Test two reboots and one controlled storage disconnect using disposable data. A missing mount should stop the workload or raise an alert rather than redirect writes to the root filesystem.
Back Up App State and Bulk Data According to Different Recovery Units
Application state often requires configuration, database consistency, secrets, and version compatibility. Bulk data may be restorable as files and directories. A single filesystem snapshot can be useful, but it does not automatically create a complete application recovery if dependencies live elsewhere.
N2WS explains that database recovery can involve data, schema, configuration details, logs, and backup metadata rather than one copied directory. That multi-part application recovery model supports separate backup policies for app state and bulk files.
Back up app definitions and consistent state frequently enough to meet the service’s acceptable data loss. Protect bulk files with snapshots or versions plus an independent copy. Exclude cache unless rebuilding it would create unacceptable downtime. Store at least one recovery copy outside the live storage pool and test both a file restore and one complete app rebuild.
Plan Capacity Growth Without Moving Every Layer
The boot drive grows through packages, logs, images, and updates. App data grows through databases, indexes, and user state. Bulk storage grows through media, backups, and archives. These rates are unrelated, so each tier needs its own warning threshold and expansion path.
TechTarget defines tiered storage as matching data to storage classes with different price, performance, capacity, and availability characteristics. That policy-based tiering concept helps prevent every capacity problem from becoming a whole-server migration.
Set alerts for root filesystem use, app-data use, and bulk-pool use separately. Keep 15–20 percent operating reserve where practical. Expand the bulk layer by adding or replacing capacity behind the same mount path. Move app state only when latency, protection, or capacity measurements justify it—not merely because a new drive has been installed.
Choose the Smallest Topology That Preserves Clear Recovery Boundaries
A very small home lab can place the boot and app-data roles on one SSD if the directories remain explicit, backed up, and bounded. Bulk files should still live on a separate capacity path. A more durable layout uses a boot SSD, a protected SSD app-data tier, and a multi-drive bulk pool, but extra devices are useful only when they simplify failure and recovery boundaries.
ServeTheHome’s compact-server project shows how a small dedicated node can be designed around a defined combination of memory, storage, and networking without requiring a rack-scale platform. That compact role-specific server model is a better first-homelab reference than adding storage layers with no measured need.
| First-homelab size | Boot layer | App-data layer | Bulk layer |
|---|---|---|---|
| One to three light services | One SSD | Explicit backed-up directories on the SSD | Separate HDD, DAS, or NAS path |
| Several database-backed apps | Dedicated boot SSD | Separate protected SSD dataset | HDD pool or storage NAS |
| Virtual machines plus shared storage | Hypervisor boot device | SSD VM and application tier | Independent bulk pool with its own backup |
| Storage-heavy household system | Replaceable system device | Protected fast application state | Multi-bay storage-first NAS |
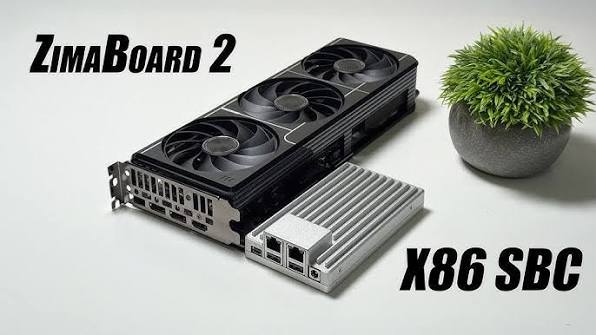
The ZimaSpace guide on building a first server around three connected services helps identify the initial app-data roles. A ZimaBoard 2 Mini Home Server fits a compact topology where the boot and app layers stay close to direct SATA or PCIe-attached storage. A ZimaCube 2 AI NAS becomes the clearer base when the bulk tier requires integrated multi-drive capacity, longer retention, concurrent access, and storage-first recovery.
The topology is successful when replacing the boot drive, rebuilding an app, or expanding bulk capacity changes only one layer and leaves the other storage roles understandable.

Recommended products

NAS & Server Setup
More to Read
A Local RAG Setup for Research Papers, Notes, and Private Documents
Keep original documents authoritative, make indexing repeatable, require citations, and separate replaceable models from private source data.
Why Are Developers Using a Gateway Node for Private DNS, VPN, and Test Apps?
A gateway node gives private apps one controlled name and access path, while compute nodes stay unexposed and replaceable.
How to Build a Reproducible App Stack With Compose Files, Secrets, and Persistent Data Separated
Keep Compose definitions portable, secrets protected, and app data independently backed up so the stack can be rebuilt on a clean host.


