
Tailscale gives a CasaOS server a private address that can be reached from your own authorized devices even when you are away from home. The original IceWhale Community tutorial, published in October 2023 for CasaOS 0.4.4 and an older Tailscale release, used the official Tailscale Docker image, an authentication key, and a second Tailscale client to create that private mesh connection.
The basic idea is still valid: run Tailscale on the CasaOS host, join it to your tailnet, install Tailscale on the remote phone or computer, and then open CasaOS using its Tailscale IP or configured DNS name. However, the screenshots and exact Docker fields are historical. Current Tailscale container deployments should also persist Tailscale state, protect the authentication credential, and follow current access-control guidance.
What This CasaOS + Tailscale Setup Does
The community guide was designed to avoid conventional public port forwarding. Instead of publishing the CasaOS dashboard directly to the internet, devices join the same Tailscale network, called a tailnet, and communicate through Tailscale addresses.
The original workflow was:
- Run the Tailscale client on the CasaOS server.
- Create or sign in to a Tailscale account.
- Generate an authentication key and provide it to the Tailscale container.
- Install Tailscale on the remote laptop, phone, or other device.
- Sign that device into the same tailnet.
- Open CasaOS using the Tailscale IP address or a tailnet DNS name.
This is private-network access. You normally do not need to forward the CasaOS dashboard port through your home router just to use it through Tailscale.
Important Version Boundary for the Original Tutorial
The original post explicitly lists CasaOS 0.4.4 and Tailscale 1.21.3. It was written in 2023, and both CasaOS and Tailscale container configuration have evolved since then. Use the screenshots below to understand the workflow rather than assuming every field will appear in exactly the same place in a current CasaOS or Docker UI.
The current official Tailscale Docker guide still supports authenticating a container with TS_AUTHKEY, but it also demonstrates persistent state and the capabilities required by the container.
Step 1: Add the Tailscale Container to CasaOS
The 2023 guide imported the official Tailscale Docker image into CasaOS. If you are reproducing the historical UI workflow, make sure the image source is the official tailscale/tailscale image rather than an unknown third-party container.
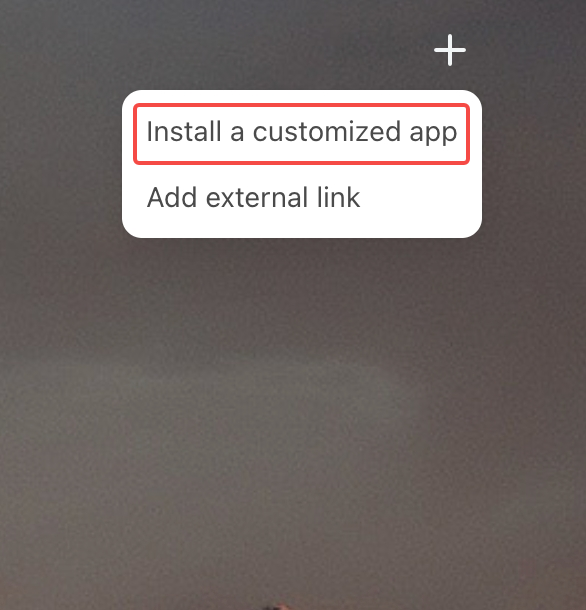

For a modern standalone Tailscale container, the official documentation shows the core pattern conceptually as:
docker run -d \
  --name tailscale \
  --hostname casaos-server \
  -e TS_AUTHKEY=<tskey-YOUR-AUTH-KEY> \
  -e TS_STATE_DIR=/var/lib/tailscale \
  -v ./tailscale-state:/var/lib/tailscale \
  --cap-add=net_admin \
  --cap-add=net_raw \
  --restart unless-stopped \
  tailscale/tailscale:latest
Do not paste an authentication key into a public post, screenshot, repository, or support ticket. Treat it like a password. The exact CasaOS Custom Install fields should represent the same Docker requirements while matching the GUI available on your version.
Step 2: Generate a Tailscale Authentication Key
The community tutorial next created a Tailscale account and generated an auth key from the Tailscale administration interface. That key was then supplied to the CasaOS container through the TS_AUTHKEY environment variable.
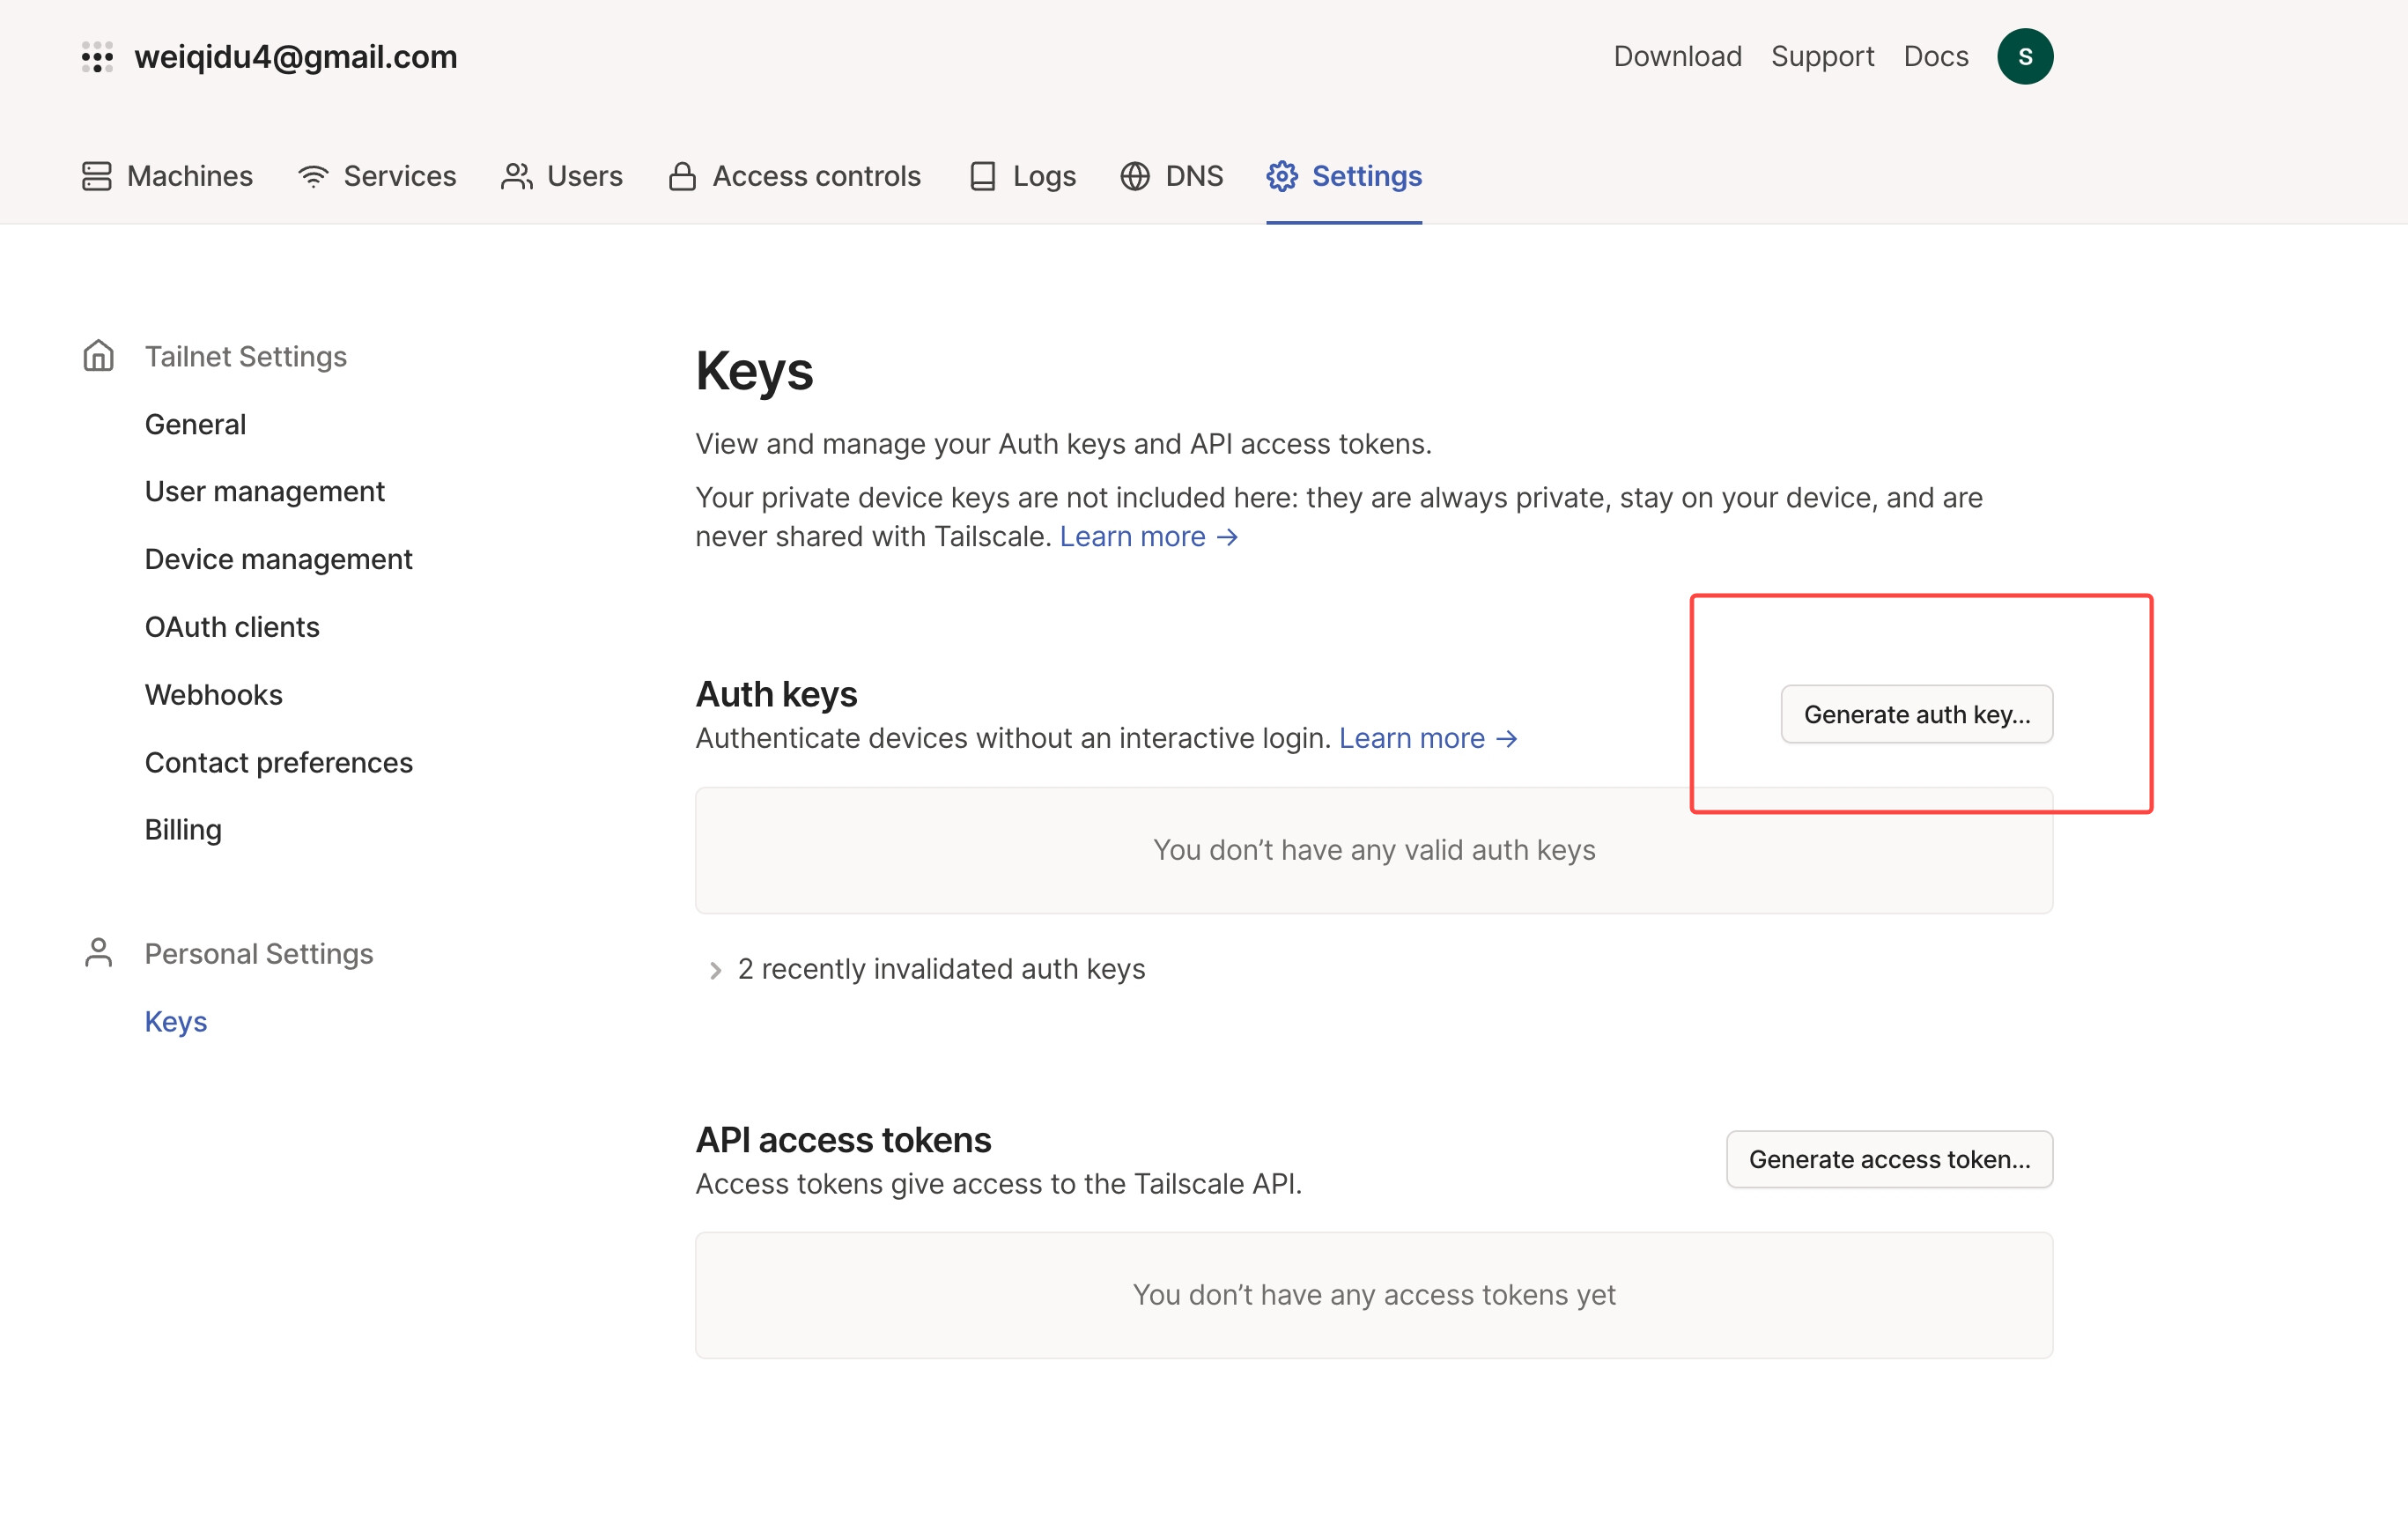
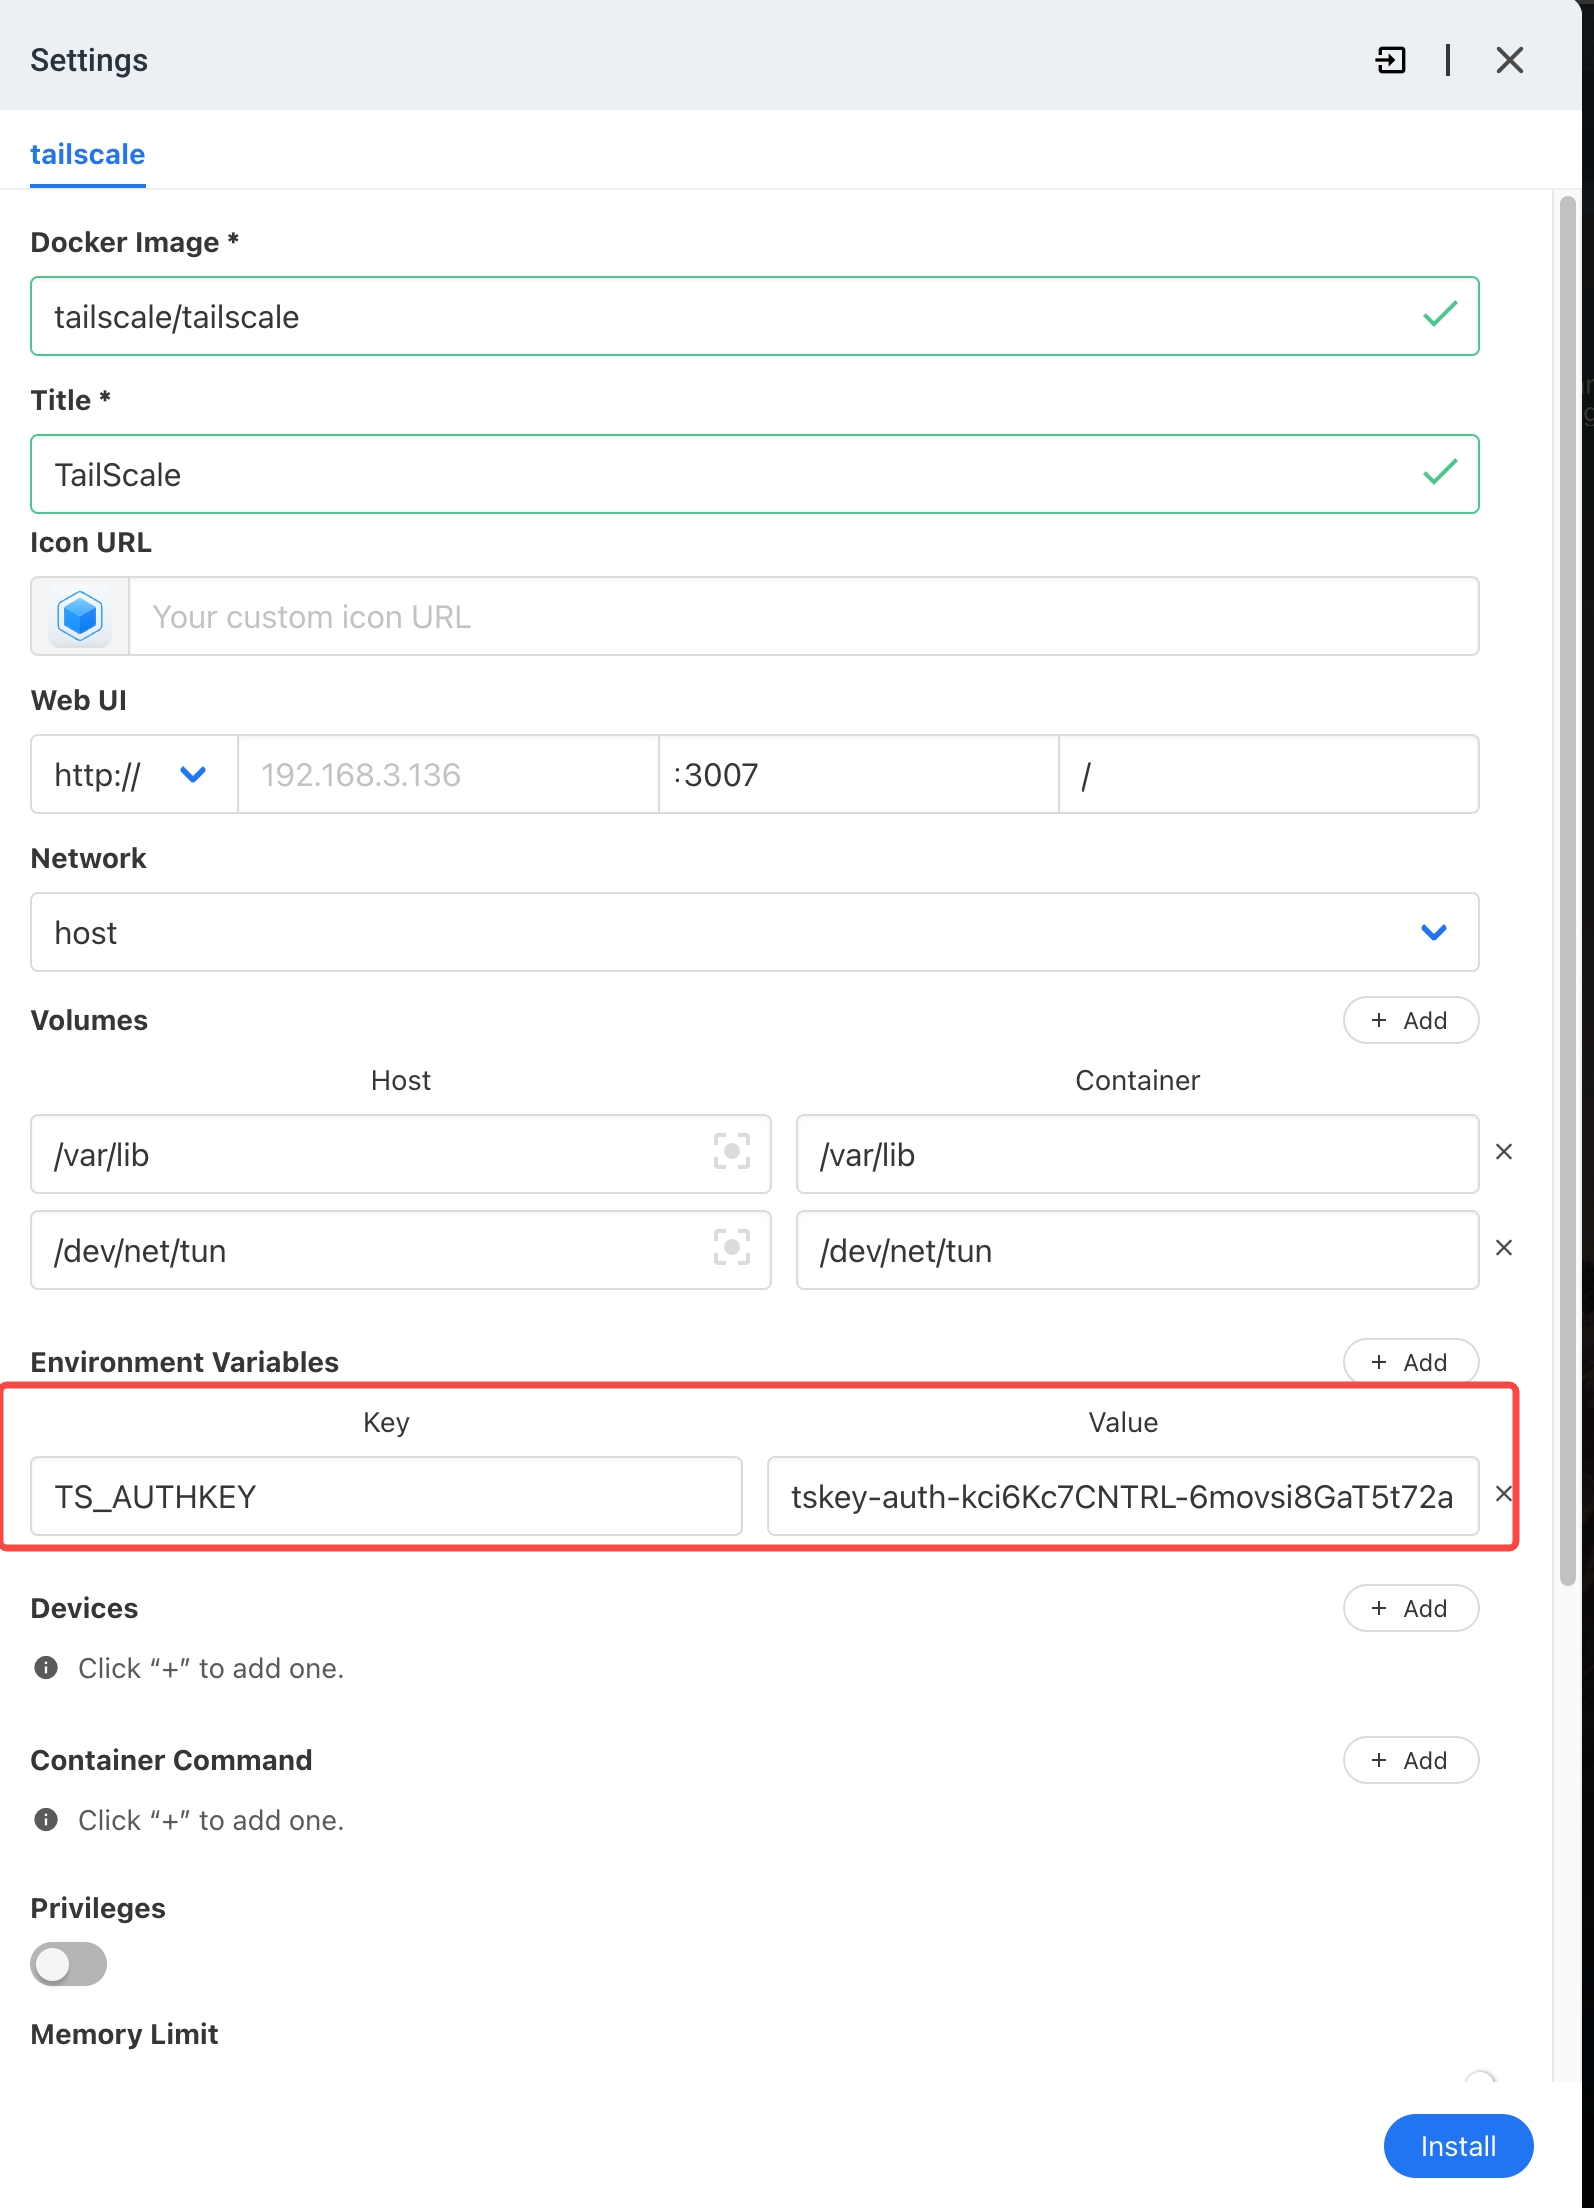
Current Tailscale documentation continues to support TS_AUTHKEY. Auth keys can be created with different properties, including reusable or ephemeral behavior. Choose only the privileges and lifetime that fit the server, and rotate a key if you believe it has been exposed.
Persist Tailscale State So Restarts Do Not Behave Like New Installs
This point is more important in a current deployment than the old screenshots make obvious. Tailscale's current Docker examples set:
TS_STATE_DIR=/var/lib/tailscaleand persist that directory with a Docker volume or bind mount. Without persistent state, recreating a container can make authentication and node identity behave differently than expected.
Tailscale also provides TS_AUTH_ONCE=true for deployments that should authenticate only when the container has no saved login state. If you use that option, make sure the state directory is actually persistent.
See the current Tailscale Docker configuration parameters before translating an old CasaOS screenshot into a new container configuration.
Step 3: Verify the CasaOS Node Appears in Tailscale
After the container starts successfully, open the Tailscale device administration page and confirm that the CasaOS node appears as connected. The original tutorial then used the device list to identify the Tailscale address assigned to the server.
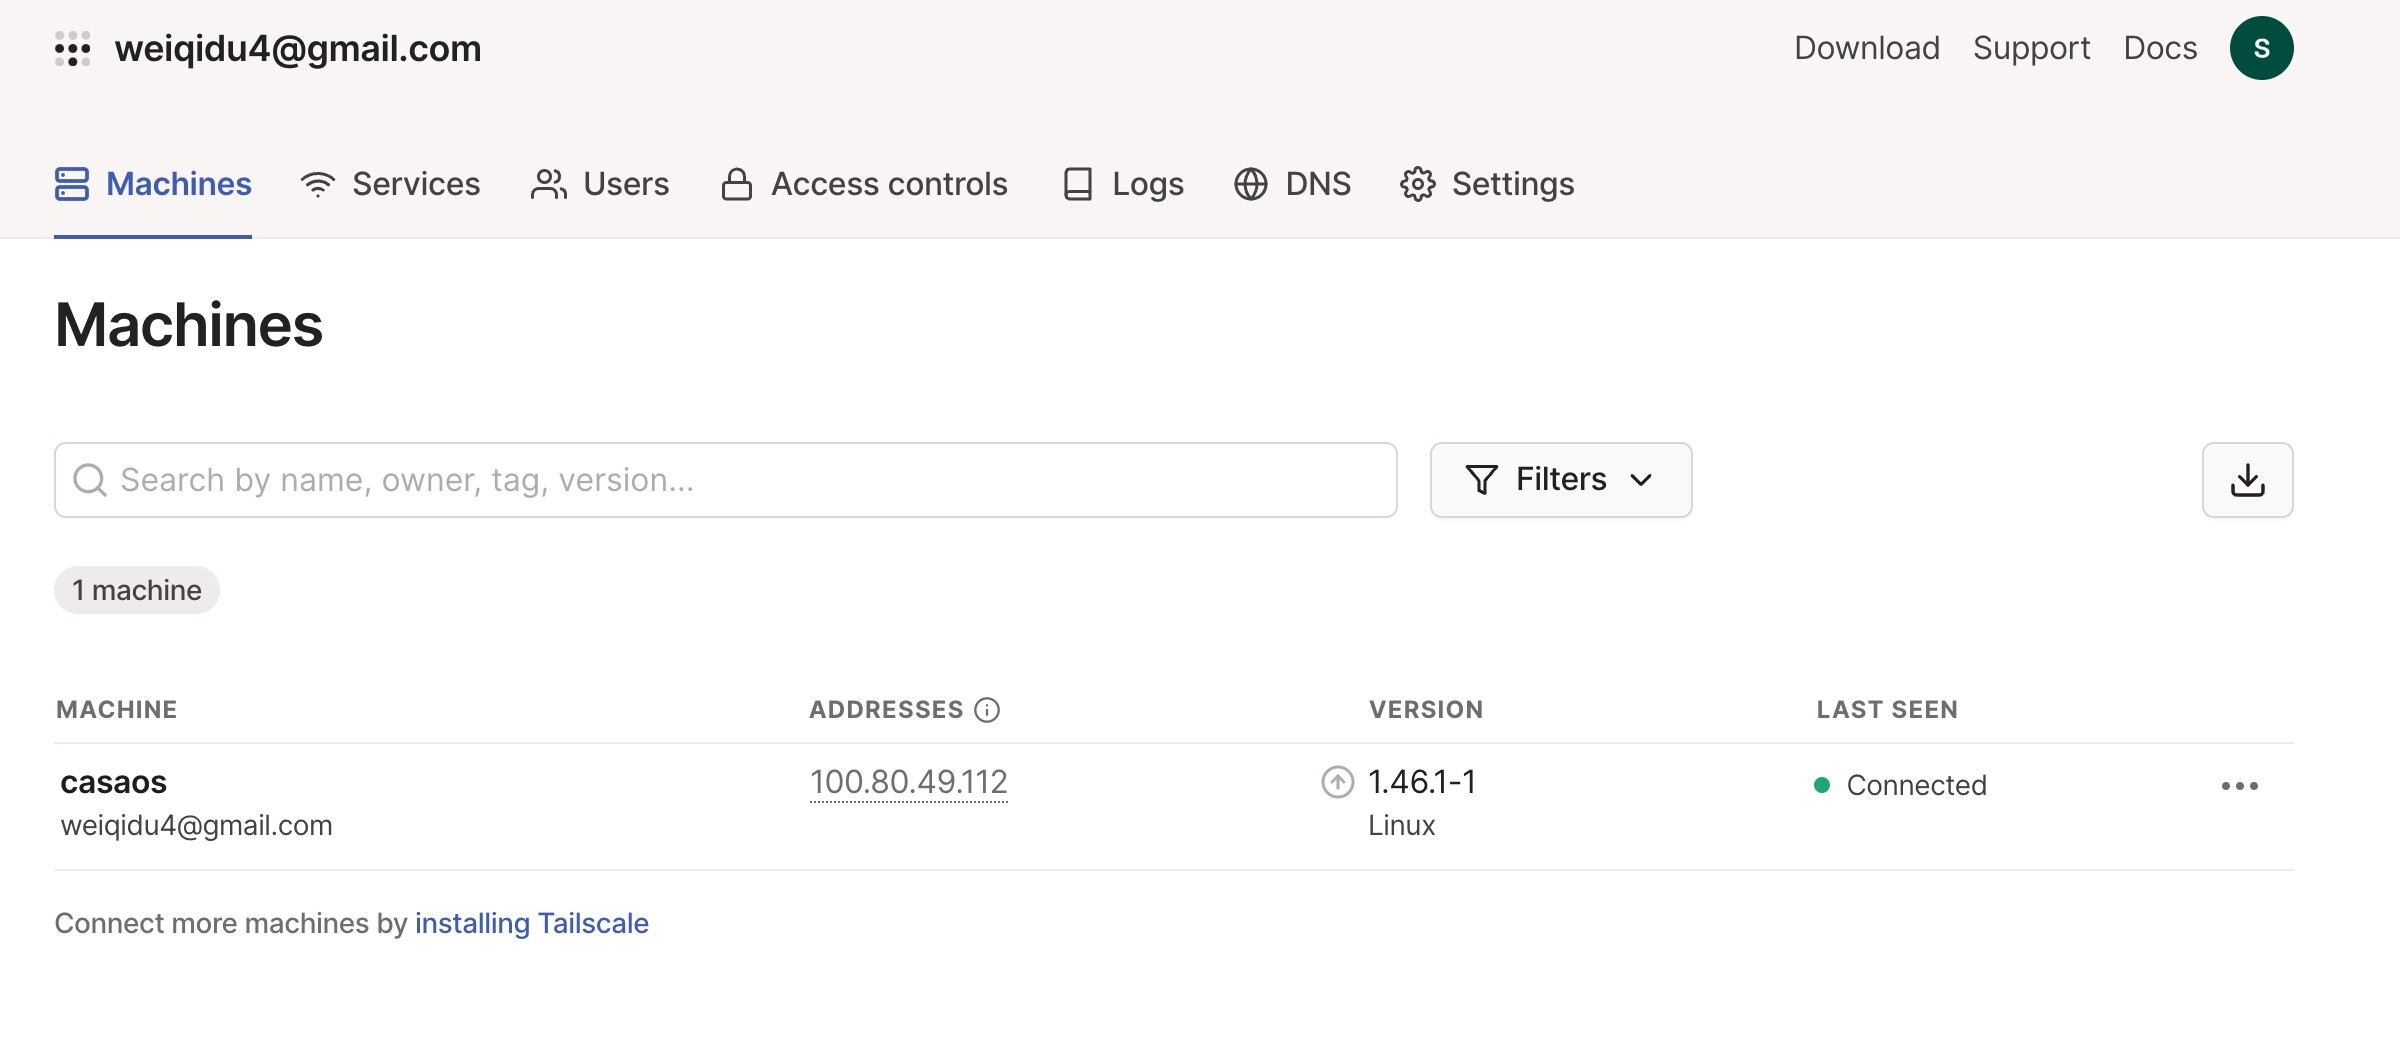
If the container runs but the server does not appear as connected, inspect the container logs, confirm the auth key is valid, and make sure the state and networking capabilities required by your current Tailscale image are configured.
Step 4: Install Tailscale on the Remote Device
Install the Tailscale client on the laptop, phone, or tablet you will use away from home, then sign in to the same tailnet. The two devices do not need to be on the same Wi-Fi network once both are connected to Tailscale.
Current Tailscale connections may be direct or relayed depending on network conditions. Tailscale's documentation states that direct, DERP-relayed, and Tailscale Peer Relay connections remain end-to-end encrypted with WireGuard; the main difference is performance rather than whether the payload is encrypted.
Step 5: Open CasaOS with Its Tailscale IP
The original guide copied the CasaOS server's Tailscale IP and entered it in a browser from the remote device.
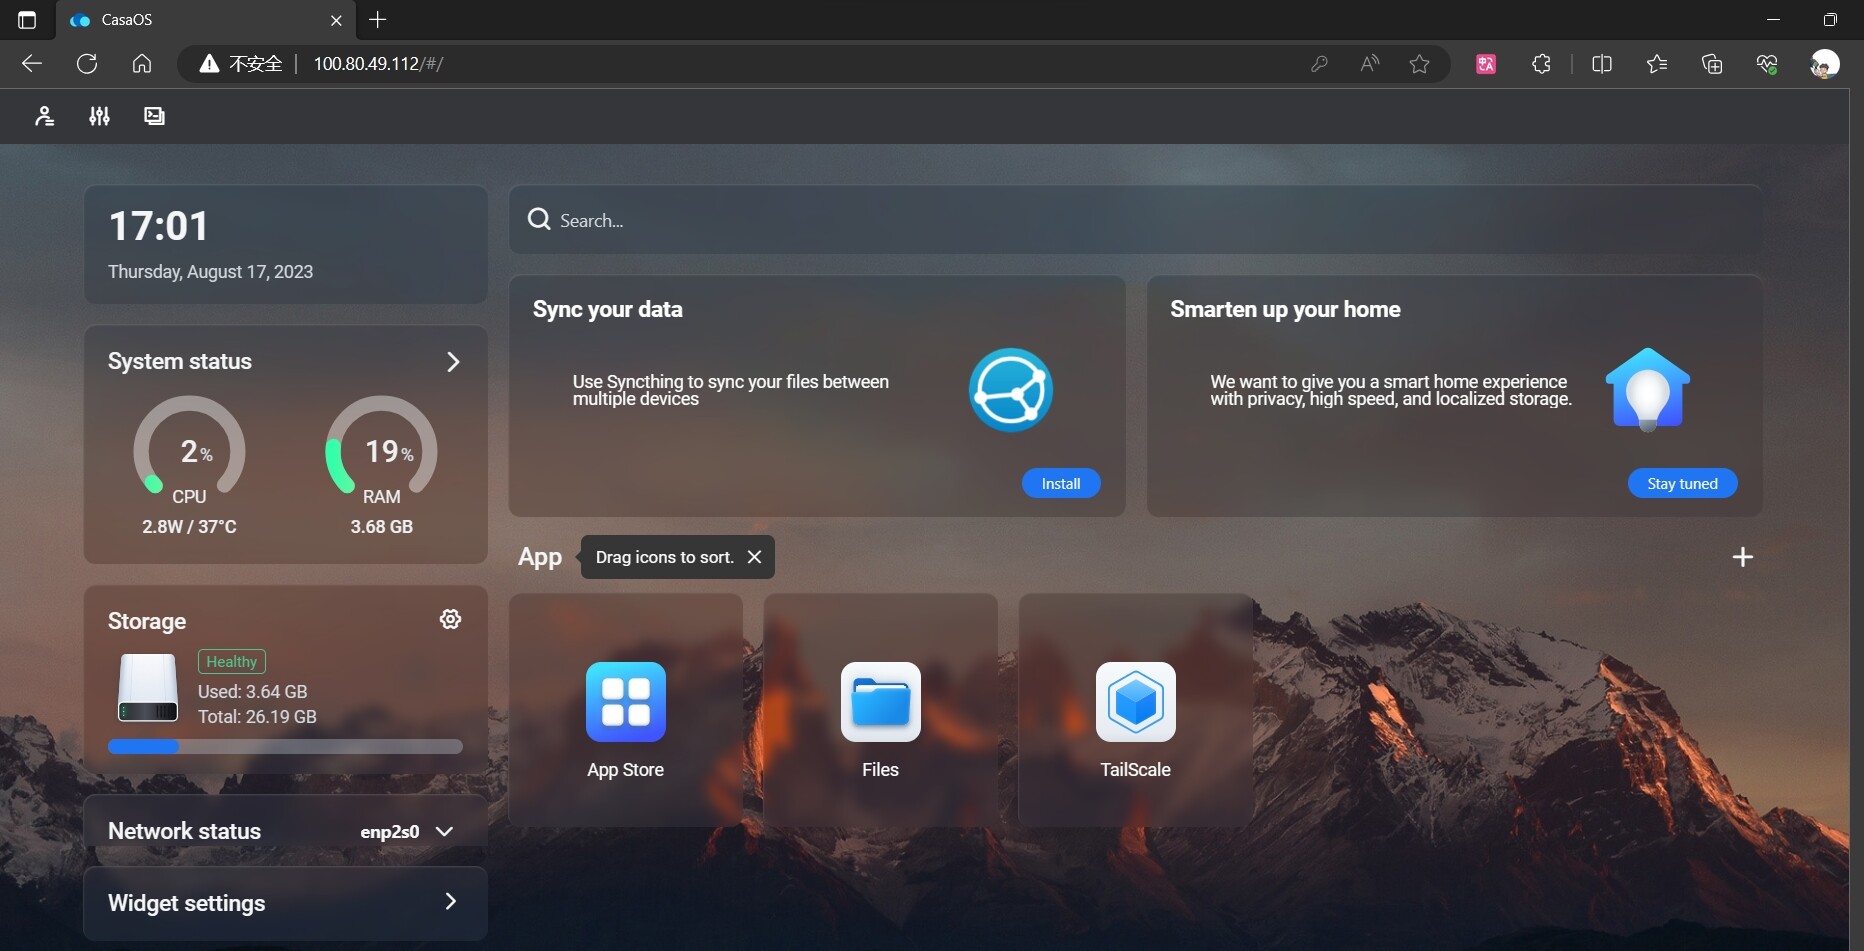
The address is typically a Tailscale 100.x.x.x IP. If your tailnet uses MagicDNS and the CasaOS node has an appropriate machine name, you can also use its Tailscale DNS name instead of memorizing the IP.
Use the CasaOS dashboard port that your installation actually listens on. If CasaOS is configured on a non-default port, include that port in the URL.
Tailscale IP and Home LAN IP Are Not the Same Thing
A common source of confusion is expecting Tailscale on one server to automatically make every normal home-network IP reachable. Connecting directly to the CasaOS machine through its Tailscale address is one setup. Reaching other devices by their ordinary LAN addresses, such as 192.168.1.x, is a different Tailscale feature called subnet routing.
If all you need is the CasaOS dashboard and apps running on that same host, start with the server's Tailscale IP. Configure subnet routing only when you intentionally want the Tailscale node to route traffic to other devices or subnets in your home network.
Security Correction: You Do Not Normally Need Another VPN Around Tailscale
The original 2023 post included a note suggesting that sensitive transfers could use an additional VPN. That wording can be misleading. Tailscale itself is an encrypted private networking system built on WireGuard. Current Tailscale documentation states that traffic between Tailscale devices is end-to-end encrypted, including when a connection is relayed.
An additional VPN is therefore not normally required merely to encrypt CasaOS traffic that is already traveling between Tailscale nodes. Running multiple VPN products at the same time can also create routing conflicts. More useful security controls are:
- Protect the identity account used to access your tailnet.
- Treat auth keys and OAuth credentials as secrets.
- Remove old or unrecognized devices from the tailnet.
- Apply least-privilege access rules rather than letting every node access every service indefinitely.
- Keep CasaOS, Docker, Tailscale, and hosted applications updated.
- Do not expose the CasaOS dashboard publicly just because Tailscale is also installed.
Tailscale now recommends Grants and access-control policies for limiting which users and devices can reach specific services.
What the Later ZimaOS Replies Added
A 2024 reply asked whether the same tutorial worked on a current ZimaCube personal cloud NAS running ZimaOS. The user could see the device as connected in Tailscale but the ZimaOS interface only partially loaded and repeatedly showed a failed-app-loading message. The original author suggested restarting and noted that ZimaOS also had its own remote-access option. The user later reported that the problem started working after updating ZimaOS to version 1.2.2.
That reply is historical evidence, not a current compatibility guarantee. It demonstrates that a Tailscale connection can be established while a particular ZimaOS UI version still has application-loading issues. A later 2025 reply said the step-by-step method also helped them get Tailscale working on ZimaOS.
If you are using modern ZimaOS rather than CasaOS, follow the current ZimaOS app and remote-access documentation instead of assuming that a 2023 CasaOS Custom Install screen is the preferred setup. The operating systems share some ecosystem history but their current app-management and remote-access workflows are not identical.
CasaOS Tailscale Troubleshooting Checklist
- Confirm the Tailscale container is running in CasaOS.
- Confirm the image is the expected official Tailscale container or another source you intentionally trust.
- Check that the authentication credential is valid and has not expired or been revoked.
- Persist
/var/lib/tailscaleso the node keeps its state across container recreation. - Verify the CasaOS server appears as connected in the Tailscale device list.
- Install Tailscale on the remote device and sign it into the same permitted tailnet.
- Test the CasaOS server's Tailscale
100.x.x.xaddress before attempting normal LAN addresses. - If the IP works but the hostname does not, review DNS or MagicDNS settings.
- If you need access to other LAN devices, configure subnet routing separately.
- Review tailnet access rules so only intended users and devices can reach CasaOS services.
CasaOS Tailscale Remote Access FAQ
Do I need to forward CasaOS ports on my router?
Not for the normal Tailscale workflow described here. Both the CasaOS server and remote client join the same private tailnet, so you access the server through its Tailscale address instead of exposing the CasaOS dashboard directly to the public internet.
What is TS_AUTHKEY?
TS_AUTHKEY is a Tailscale Docker environment variable used to authenticate a container into a tailnet. Current Tailscale Docker documentation still supports it. Treat the value as a secret and rotate it if it is exposed.
Why should I persist /var/lib/tailscale?
That directory stores Tailscale state for the container. Persisting it helps the container retain its node identity and authentication state when Docker restarts or recreates the container.
Why can I reach the 100.x Tailscale IP but not my 192.168.x.x home address?
Connecting to the CasaOS server itself and routing an entire home subnet are different configurations. Normal Tailscale node access uses the server's Tailscale IP. Access to other LAN addresses requires subnet-routing configuration and approval.
Is Tailscale encrypted?
Yes. Tailscale uses WireGuard for encrypted communication between tailnet devices. Current Tailscale documentation states that direct and relayed connections remain end-to-end encrypted.
Are the 2023 CasaOS screenshots still current?
They should be treated as historical UI references. The underlying workflow of running Tailscale, authenticating the node, and connecting remote devices is still relevant, but current Docker parameters and CasaOS or ZimaOS interfaces may differ.


