
يمكن تثبيت ZimaOS على جهاز Proxmox افتراضي لأغراض الاختبار، وقد وثّق برنامج تعليمي من IceWhale Community في مايو 2025 طريقة مباشرة باستخدام البرنامج الثابت UEFI وتمرير USB. أنشأ المؤلف الأصلي جهازًا افتراضيًا عاديًا، واختار OVMF/UEFI، ومرّر مُثبّت USB إلى الجهاز الافتراضي، ووضع USB أولًا في ترتيب الإقلاع، ثم شغّل مُثبّت ZimaOS من وحدة تحكم Proxmox.
ينبغي التعامل مع هذا بوصفه سير عمل اختباريًا مجتمعيًا، وليس ضمانًا لدعم كل ميزات ZimaOS رسميًا ضمن المحاكاة الافتراضية. أشارت منشورات مجتمعية لاحقة صراحةً إلى أن ZimaOS مصمم ليكون نظام تشغيل مستقلًا، وأن عمليات النشر الافتراضية قد تفرض قيودًا على المحاكاة الافتراضية المتداخلة وتمرير الأجهزة والتخزين ووكيل الضيف. وفي عام 2026، أبلغ مستخدم آخر أيضًا عن صعوبة إعادة تنفيذ عملية Proxmox القديمة باستخدام مُثبّتات ZimaOS الأحدث، لذا استخدم لقطات الشاشة التاريخية لفهم البنية بدلًا من افتراض أن كل خطوة من خطوات عام 2025 ما زالت كما هي.
الخطوة 1: إنشاء جهاز Proxmox افتراضي باستخدام UEFI
كان أهم إعداد للجهاز الافتراضي في البرنامج التعليمي المصدر هو نوع البرنامج الثابت. أثناء إنشاء الجهاز الافتراضي، اختر BIOS من نوع OVMF/UEFI بدلًا من SeaBIOS.
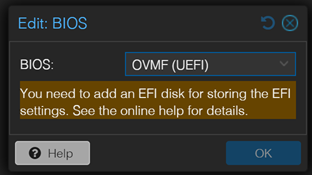
إذا كان الجهاز الافتراضي قد أُنشئ مسبقًا باستخدام البرنامج الثابت الخاطئ، فقال المؤلف الأصلي إنه يمكن تغييره من:
الجهاز الافتراضي → الأجهزة → BIOS → OVMF (UEFI)ذكر المنشور التاريخي أن قرص EFI لم يكن مطلوبًا لإعداد الاختبار المحدد ذاك. ينشئ الآن نص برمجي تابع لجهة خارجية خاص بـ Proxmox-ZimaOS مساحة تخزين EFI في سير عمله اليدوي، لذا اعتبر ذلك اختلافًا في الإصدار والأدوات، وليس تناقضًا.
مثال على تعريف جهاز افتراضي من الموضوع الأصلي
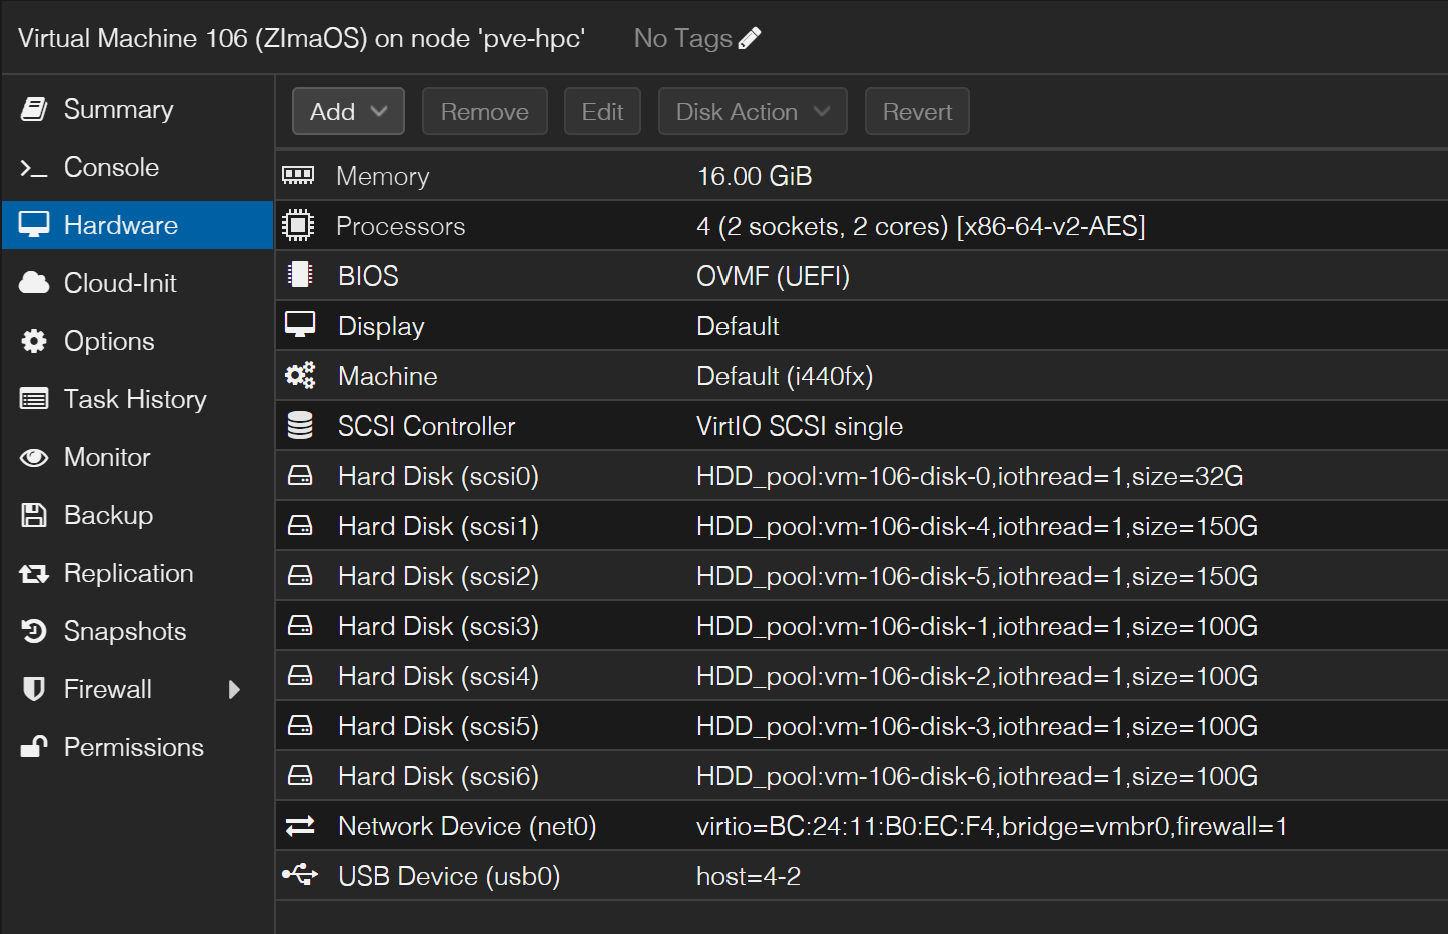
يمكن ضبط وحدة المعالجة المركزية والذاكرة وحجم القرص الافتراضي وإعدادات الشبكة لتلائم حمل الاختبار. لا تستخدم جهازًا افتراضيًا صغيرًا جدًا للحكم على أداء التخزين أو Docker أو تحويل الترميز أو ZVM الذي سيعمل لاحقًا على أجهزة فعلية.
الخطوة 2: استخدام مُثبّت ZimaOS الحالي
طلب البرنامج التعليمي لعام 2025 من القرّاء تنزيل أحدث صورة لمُثبّت ZimaOS.
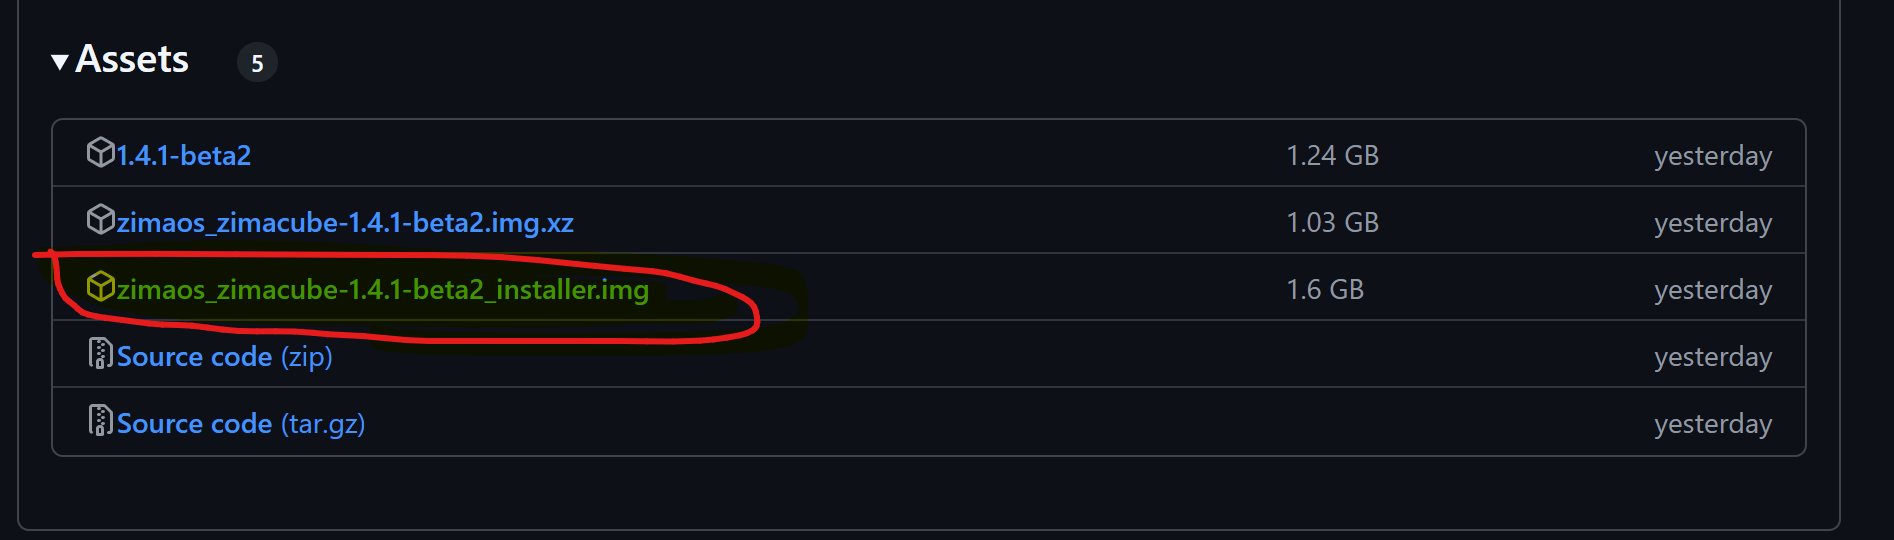
تغيّر نموذج إصدار ZimaOS وتوزيعه منذ هذا الموضوع المنشور عام 2025. تجنّب تثبيت أسماء صور الإصدارين القديمين 1.4.0 أو 1.4.1 beta في سير عمل حالي.
الخطوة 3: كتابة برنامج التثبيت على USB
كتب المؤلف الأصلي برنامج التثبيت على محرك أقراص USB فعلي باستخدام Balena Etcher، ثم وصّل جهاز USB هذا بمضيف Proxmox الفعلي.
هذه الطريقة بسيطة لأنها تحاكي مسار تثبيت عادي على جهاز فعلي داخل الجهاز الافتراضي. لكنها تتطلب جهاز USB احتياطيًا وتمرير USB في Proxmox.
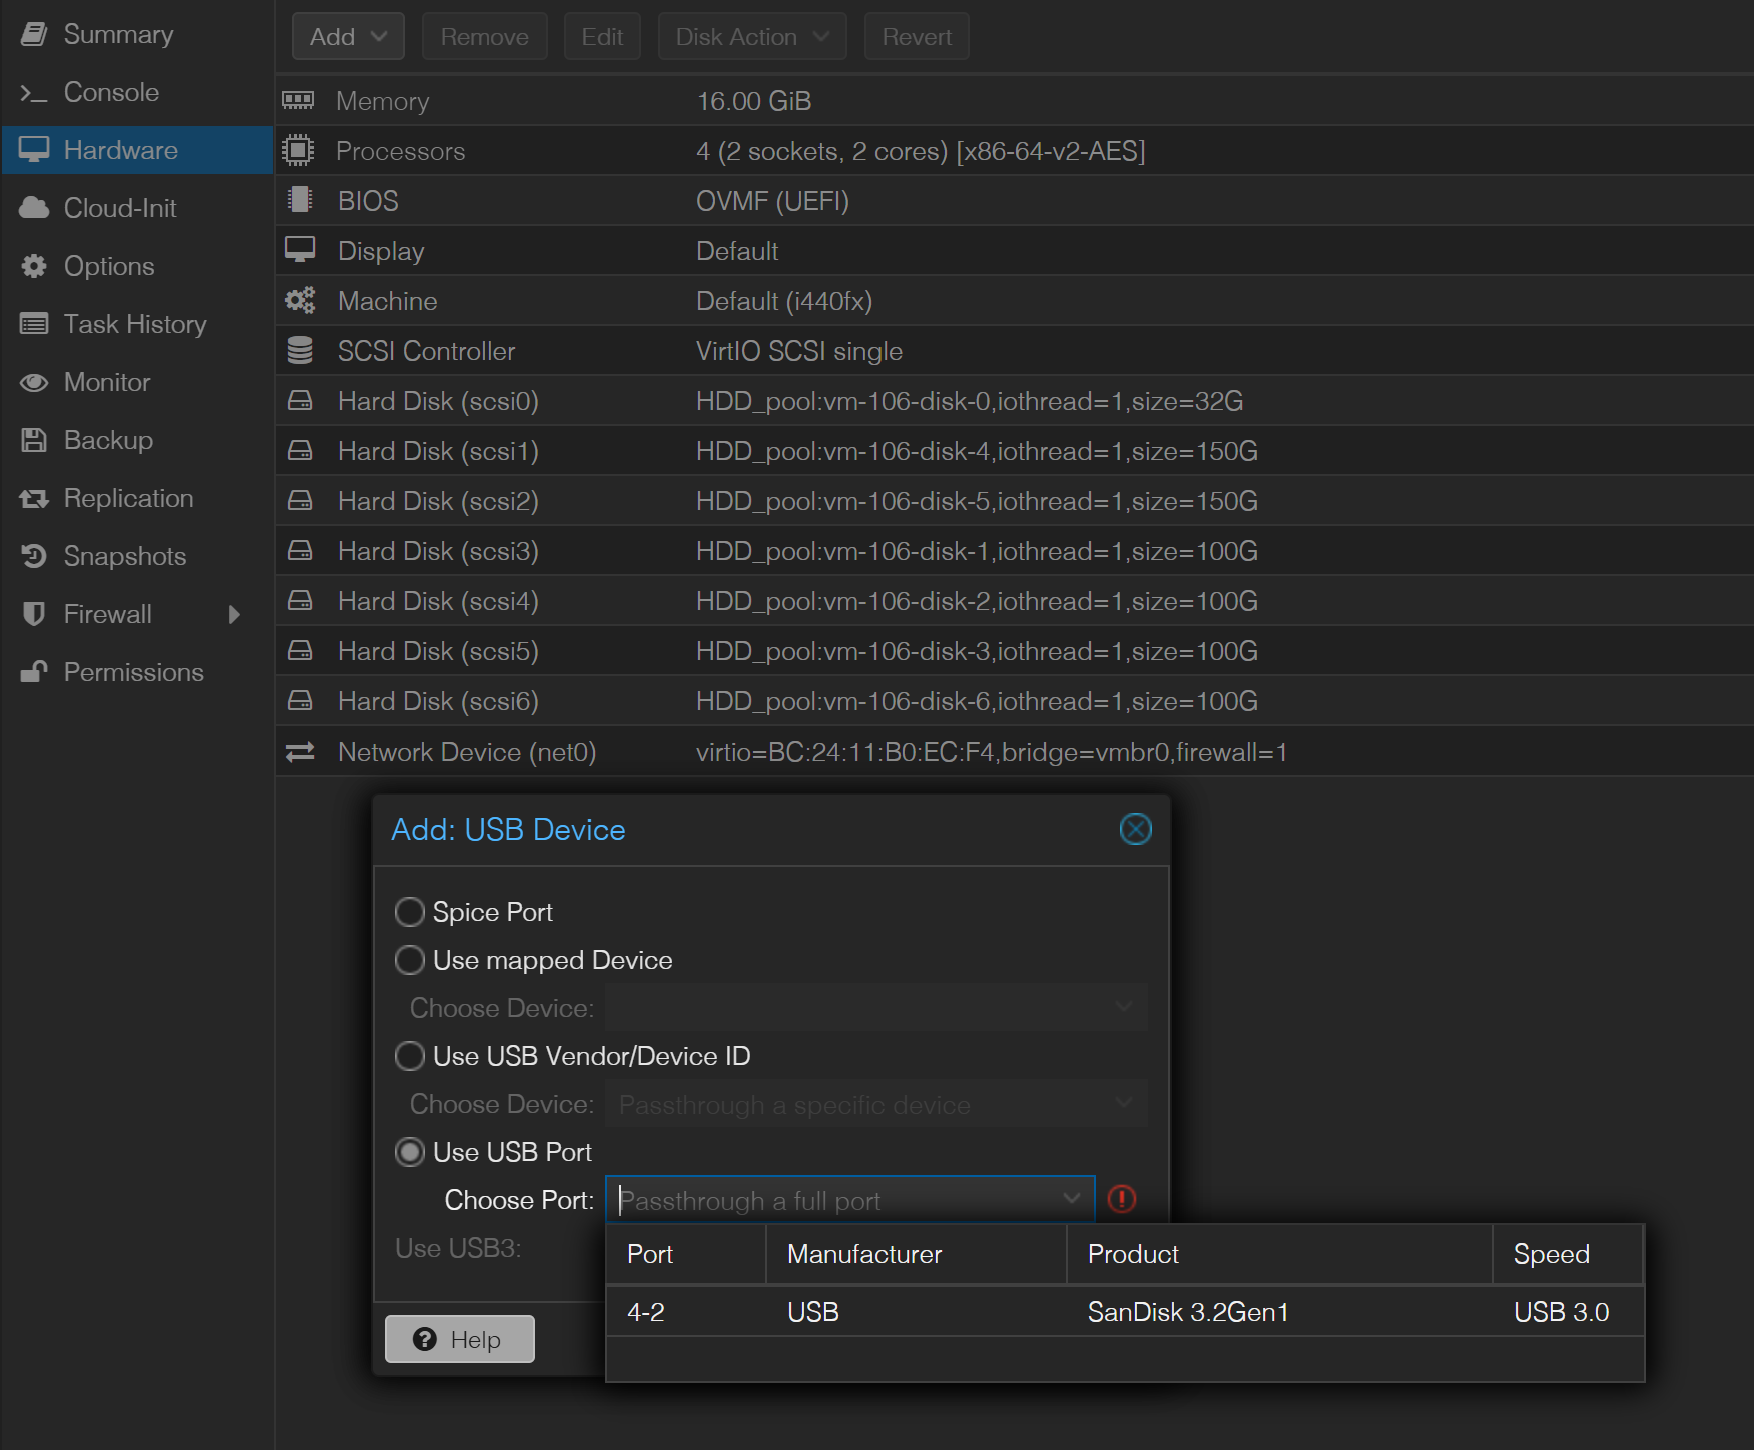
الخطوة 4: مرّر USB المُثبّت إلى الجهاز الافتراضي
في Proxmox:
الجهاز الافتراضي ← الأجهزة ← إضافة ← جهاز USBحدّد استخدام منفذ USB واختر المنفذ الذي يحتوي على محرك مُثبّت ZimaOS.
الخطوة 5: اجعل USB أولًا في ترتيب الإقلاع
افتح:
الجهاز الافتراضي ← الخيارات ← ترتيب الإقلاعفعّل جهاز USB الممرَّر وانقله فوق قرص النظام الخاص بالجهاز الافتراضي.
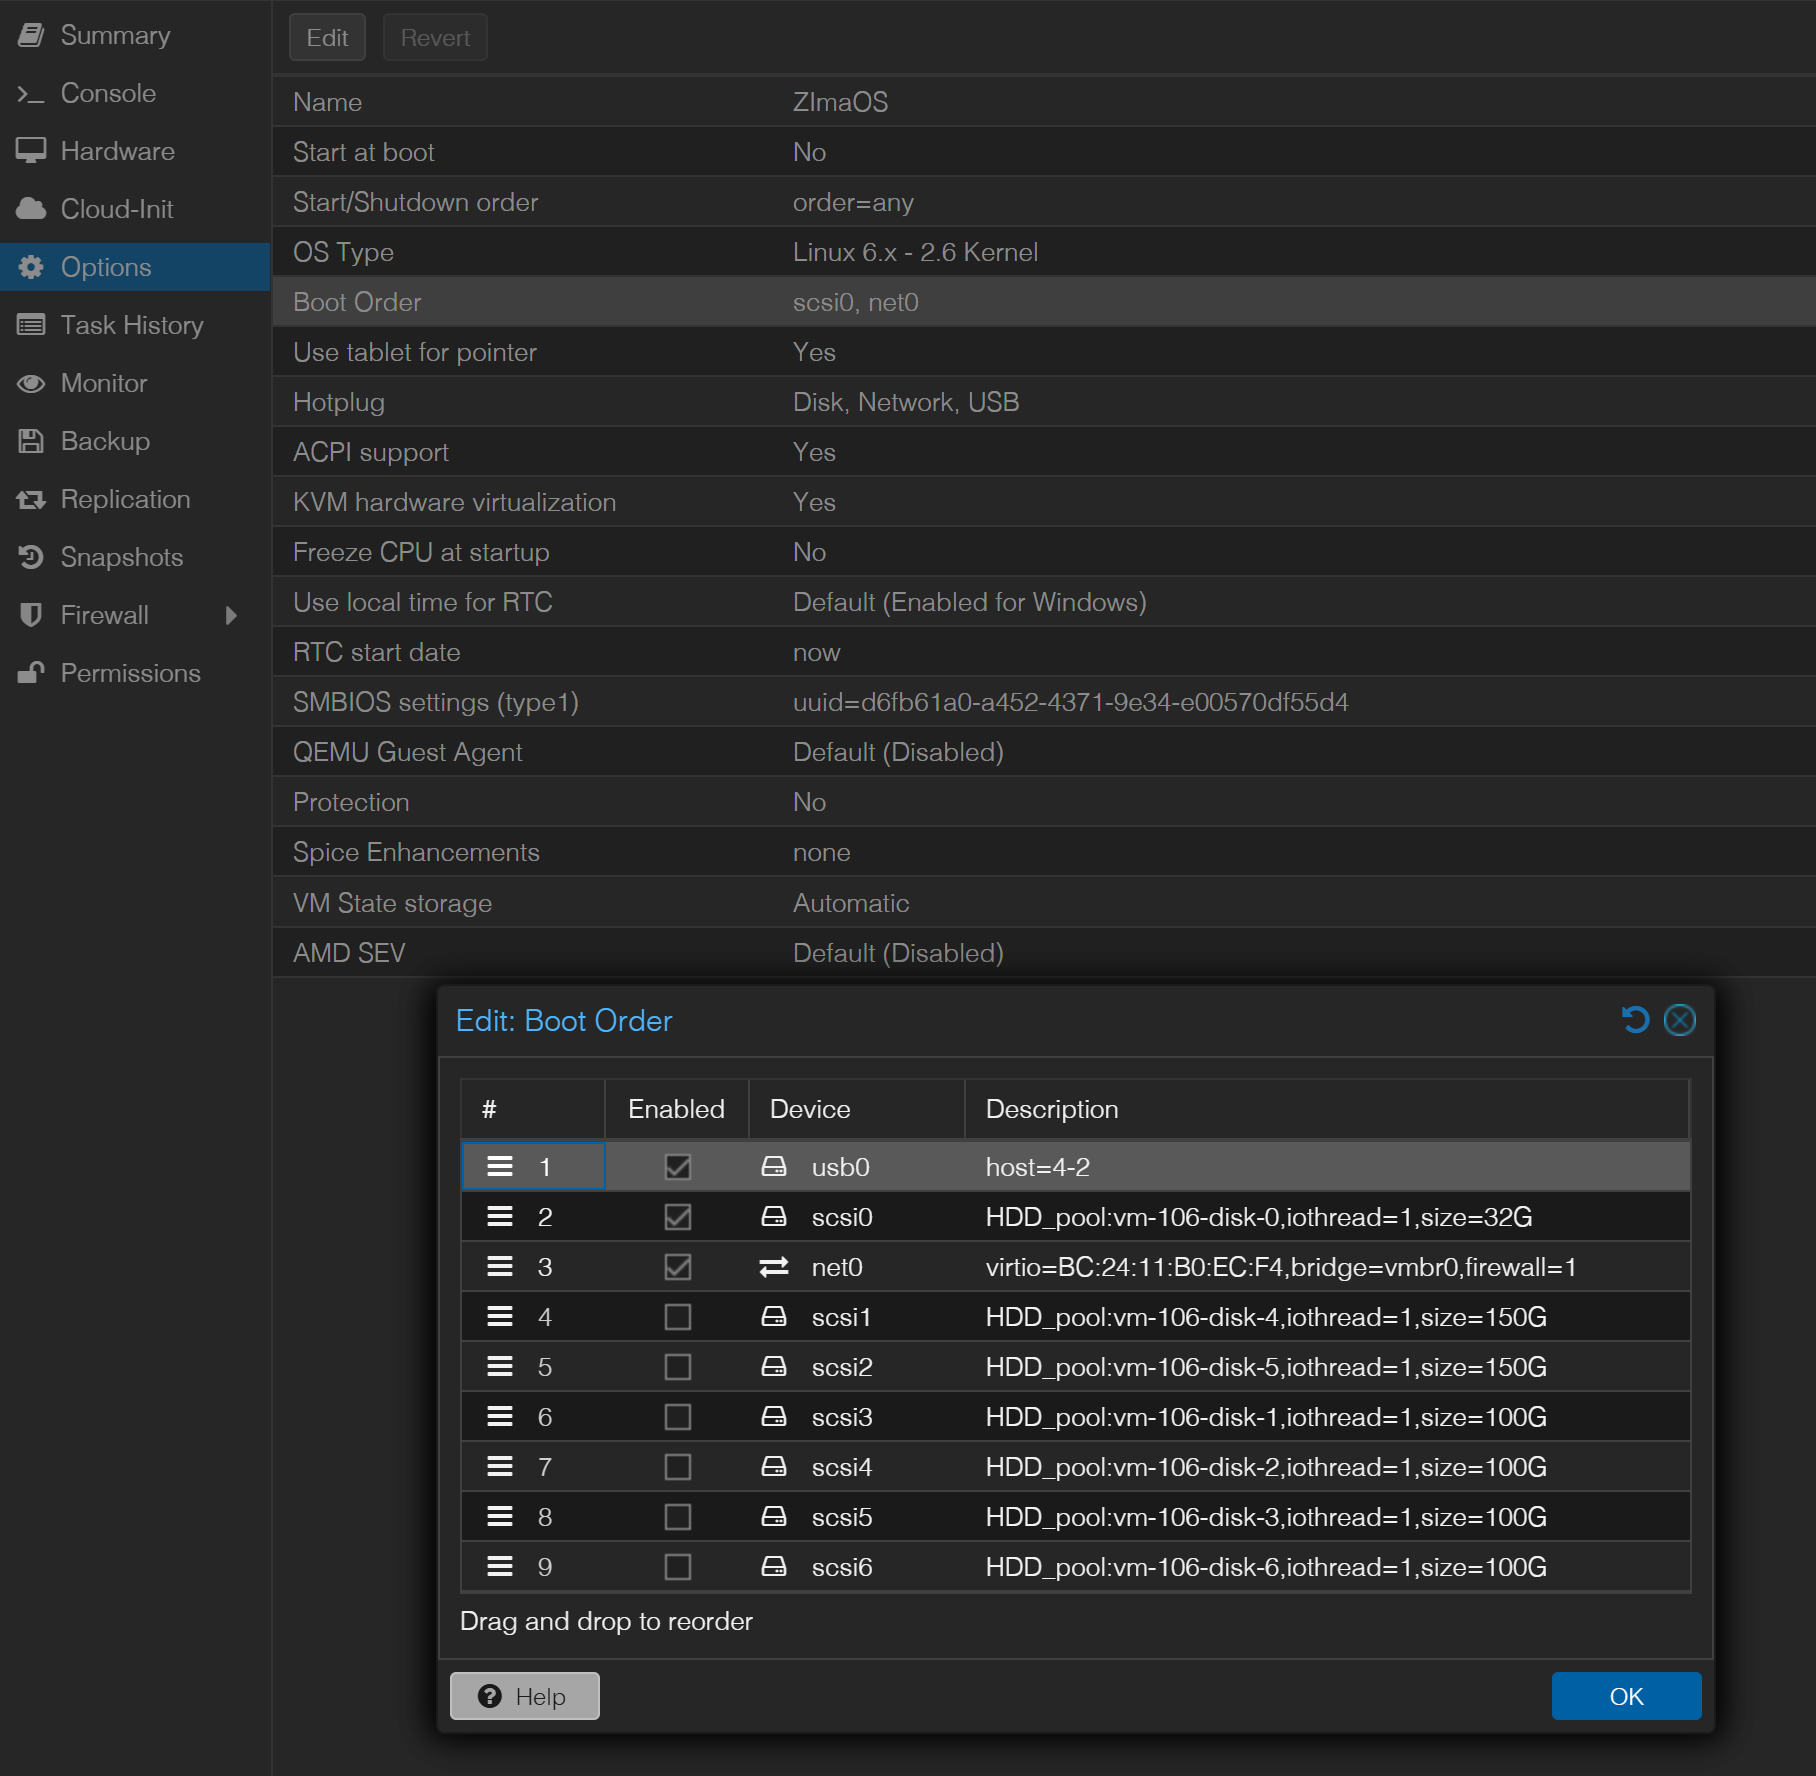
الخطوة 6: شغّل الجهاز الافتراضي ونفّذ المُثبّت
افتح وحدة تحكم Proxmox وشغّل الجهاز الافتراضي. يفترض أن يظهر مُثبّت ZimaOS. ثبّت ZimaOS على القرص الافتراضي المستهدف، ثم أزل وسيط التثبيت أو اجعله أدنى أولوية بعد اكتمال التثبيت.
أفاد المؤلف الأصلي بأن ZimaOS 1.4.0 و1.4.1-beta2 عملا عند الإقلاع في هذا الإعداد، بينما لم يعمل 1.4.1-beta1. هذه النتائج الخاصة بالإصدارات تاريخية، ولا ينبغي استخدامها لاختيار إصدار حالي.
رد لاحق من المجتمع أشار إلى برنامج نصي لأتمتة Proxmox
في يوليو 2025، ذكر مشارك آخر أنه ثبّت ZimaOS على Proxmox باستخدام برنامج نصي. يشير ذلك الرابط الآن إلى مستودع R0GGER/proxmox-zimaos التابع لجهة خارجية.
يدعم المستودع حاليًا مساري التثبيت التلقائي واليدوي. وتشير وثائقه إلى قيد حالي مهم: تغيّر توزيع ZimaOS من نشر الصور مباشرةً إلى استخدام برامج التثبيت، لذا قد يثبت البرنامج النصي التلقائي إصدارًا أساسيًا أقدم ثم يتطلب تحديثًا من داخل ZimaOS.
يحتوي المستودع أيضًا على فيديو تثبيت منفصل، لكن ذلك الفيديو لم يُضمَّن في منشور IceWhale الأصلي، لذا أُبقي عليه كمرجع خارجي بدلًا من نقله كمحتوى مصدر.
راجع برامج التثبيت النصية التابعة لجهات خارجية قبل تشغيلها
يوفر مستودع المجتمع أوامر تُنزّل برنامجًا نصيًا لـ shell وتنفذه مباشرةً على عقدة Proxmox. هذا مريح، لكنه يمنح البرنامج النصي صلاحيات إدارية للتحكم في إنشاء الأجهزة الافتراضية والتخزين والشبكات.
راجع مصدر البرنامج النصي قبل تنفيذه على مضيف Proxmox يحتوي على أجهزة افتراضية أو أقراص مهمة. فمضيف المحاكاة الافتراضية نظام عالي التأثير، وقد يؤدي تحديد هدف تخزين خاطئ إلى تدمير البيانات.
وكيل ضيف QEMU يمثل قيدًا معروفًا في ZimaOS الأساسي
سأل رد لاحق عن كيفية تثبيت qemu-guest-agentأفاد عضو المجتمع gelbuilding بأن ZimaOS الأساسي نظام غير قابل للتغيير ومقيد، ولا يوفر سير عمل عاديًا لمدير الحزم لتثبيت وكيل الضيف.
كما حاولوا تشغيل الوكيل في Docker، لكن قناة virtio في Proxmox:
/dev/virtio-ports/org.qemu.guest_agent.0لم يعمل بشكل صحيح عبر الحاوية في اختبارهم.
لذلك لا يقدم النقاش الأصلي حلًا مؤكدًا لـ QEMU Guest Agent في ZimaOS القياسي. لا تعد بوظائف عادية لوكيل الضيف لمجرد أن الآلة الافتراضية تعمل.
تشغيل ZimaOS افتراضيًا مفيد للاختبار، لكنه يخضع لحدود الدعم
ذكر رد لاحق من دعم مجتمع ZimaOS في ديسمبر 2025 أن ZimaOS مصمم كنظام تشغيل مستقل، وأن البيئات الافتراضية غير مدعومة رسميًا، رغم نجاح المستخدمين في تشغيله على Proxmox وVirtualBox.
وهذا يعني أن آلة Proxmox الافتراضية ممتازة من أجل:
- تقييم واجهة الويب؛
- اختبار تطبيقات Docker؛
- تعلّم واجهة التخزين؛
- تجربة التحديثات قبل نقلها إلى نظام اختبار منفصل.
وهو أقل تمثيلًا في:
- إدارة الأقراص مباشرة؛
- تمرير USB؛
- تمرير GPU؛
- الافتراضية المتداخلة في ZVM؛
- سكون العتاد وإدارة الطاقة؛
- تكامل QEMU guest-agent.
ملاحظة حول الوصول إلى SMB في Windows 10 من الردود
أفاد مستخدم لاحق بأن Windows 11 وLinux Mint اكتشفا آلة ZimaOS الافتراضية فورًا، بينما تطلب Windows 10 تعيين محرك أقراص شبكي يدويًا باستخدام الاتصال باستخدام بيانات اعتماد مختلفة.
هذه تفاصيل مصادقة SMB تخص العميل، وليست متطلبًا لشبكات Proxmox. إذا كانت واجهة ZimaOS على الويب تعمل، لكن Windows لا يستطيع تحميل مشاركة، فاستكشف بيانات اعتماد SMB بشكل منفصل عن محول الشبكة الأساسي للآلة الافتراضية.
قائمة التحقق لتشغيل ZimaOS على Proxmox
- أنشئ آلة افتراضية للاختبار باستخدام البرنامج الثابت UEFI/OVMF.
- خصص قدرًا كافيًا من وحدة المعالجة المركزية والذاكرة العشوائية والقرص، مع شبكة موصولة بجسر، بما يناسب عبء العمل الذي تريد تقييمه.
- استخدم برنامج تثبيت ZimaOS الحالي بدلًا من صورة تجريبية قديمة من منشور 2025.
- وفق سير العمل الأصلي، اكتب برنامج التثبيت على USB ومرّره إلى الآلة الافتراضية.
- ضع برنامج التثبيت أولًا في ترتيب الإقلاع.
- ثبّته على القرص الافتراضي، ثم أزل وسائط التثبيت أو اخفض أولويتها.
- لا تفترض توفر QEMU Guest Agent داخل ZimaOS القياسي.
- راجع نصوص Proxmox البرمجية التابعة لجهات خارجية قبل تنفيذها بصلاحيات الجذر.
- استخدم آلة افتراضية للاختبار، لا كدليل على أن جميع وظائف ZimaOS الخاصة بالعتاد مدعومة رسميًا.
الأسئلة الشائعة حول ZimaOS على Proxmox
هل يمكن تشغيل ZimaOS على Proxmox؟
نعم، شغّله مستخدمون من المجتمع بنجاح لأغراض الاختبار. استخدم الدليل الأصلي UEFI وتمرير USB.
هل يُعد Proxmox نشرًا مدعومًا رسميًا لـ ZimaOS؟
وصفت ردود دعم المجتمع تشغيل ZimaOS افتراضيًا بأنه غير مدعوم، رغم إمكانية عمله على Proxmox وVirtualBox. اعتبره نشرًا مجتمعيًا/تجريبيًا.
هل أحتاج إلى UEFI؟
استخدم الدليل الأصلي OVMF/UEFI، وحدده باعتباره إعداد البرنامج الثابت الأساسي.
هل يمكنني تثبيت qemu-guest-agent؟
لم يعثر النقاش الأصلي على طريقة ناجحة باستخدام ZimaOS القياسي. وكان النظام غير القابل للتغيير والوصول إلى قناة virtio هما العائقين المذكورين.


