
Turn an Old Mini PC Into a Personal Cloud Server


Quick Answer
Yes, you can turn an old mini PC into a personal cloud server if it can run a stable server operating system, connect reliably to your local network, and provide enough storage for your files, apps, and backups.
The basic path is:
-
Check whether the mini PC is still suitable for always-on server use.
-
Choose a server operating system or NAS-oriented system.
-
Create a bootable USB installer.
-
Install the system and complete the first login.
-
Add storage, file sharing, photo backup, media, or Docker apps.
-
Set up remote access only after you understand the security boundary.
The most important point is that a personal cloud server is not just “an old computer with files on it.” It is a small infrastructure stack. The hardware, operating system, storage, apps, network access, and backup plan all need to work together.
What Does It Mean to Turn an Old Mini PC Into a Personal Cloud Server?
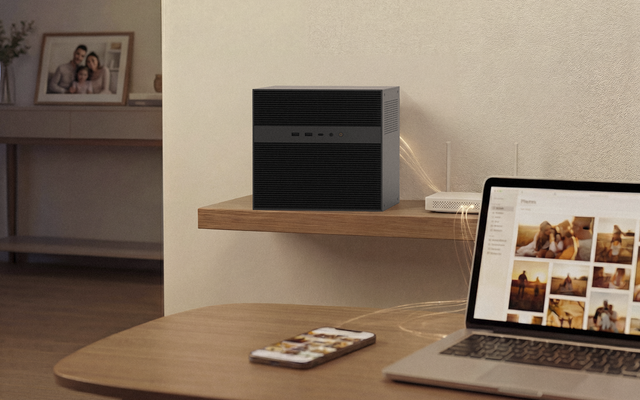
Turning an old mini PC into a personal cloud server means repurposing it as a small always-on machine that stores files, runs apps, and lets you access your data from other devices.
For most beginners, this usually means one or more of the following:
-
A private file storage space for documents and family files.
-
A photo backup server for phones and cameras.
-
A media server for music, movies, or home videos.
-
A lightweight Docker host for self-hosted apps.
-
A local server that can be accessed from your home network, and sometimes remotely through a safer access method.
The word “cloud” can be confusing here. You are not creating a public cloud platform like Google Drive or Dropbox. You are building a private server that gives you some cloud-like convenience while keeping the hardware and storage under your control.
A good beginner setup does not need to be powerful. It needs to be understandable, stable, and easy to recover if something goes wrong.
What You Need Before You Start
Before installing anything, check whether the old mini PC can realistically work as a small server. A machine that still boots and opens a browser is not always ready to become a personal cloud server.
The table below shows the main readiness checks.
| Readiness Area | What to Check | Why It Matters |
| CPU architecture | Whether the system can run a modern server OS, often x86-64 for mini PCs | Some server systems and NAS-oriented systems require a compatible processor architecture |
| RAM | Whether memory is enough for the OS and planned apps | File sharing is light, but photo apps, media indexing, and Docker services need more memory |
| Storage | Internal drive health, available capacity, and room for external or additional drives | Personal cloud storage grows quickly once photos, backups, and app data are added |
| Boot support | Whether the mini PC can boot from USB and use the required boot mode | Installation often depends on USB boot and BIOS/UEFI settings |
| Network | Ethernet or stable Wi-Fi, local IP access, and router visibility | A personal cloud server is only useful if other devices can reliably reach it |
| Power and cooling | Whether the machine can run for long periods without overheating | Servers are often left on for long sessions or always-on use |
For hardware requirements, use official system requirements as a reality check rather than assuming every old machine is suitable. For example, IBM’s Linux x86-64 server requirements show how server software can depend on processor type, disk space, memory, operating system support, libraries, and TCP/IP networking, which is why a personal cloud plan should start with hardware and OS compatibility rather than app installation alone.
A Mini PC That Can Run a Server OS
The mini PC should be able to install and run a stable operating system. In many beginner setups, this means a Linux-based server OS, a NAS-oriented OS, or another lightweight system designed for always-on use.
Do not assume that the newest-looking option is always best. The better choice is the one your hardware can boot, update, and run reliably.
A usable mini PC should typically have:
-
A compatible CPU architecture.
-
Enough RAM for the OS and planned services.
-
A healthy internal drive or a clear external storage plan.
-
USB boot support.
-
A working network adapter.
-
Basic BIOS or UEFI access.
If the device cannot reliably boot, overheats quickly, or uses failing storage, it may create more risk than value as a personal cloud server.
A Storage Plan for Files, Backups, and Apps
Storage is where many beginner setups become confusing. Your personal files, media library, photo backups, and app data may not all live in the same place.
A simple way to think about storage is to separate it into three categories:
| Storage Type | Example Data | What to Plan |
| Active files | Documents, shared folders, current projects | Where users will read and write files every day |
| App data | Photo libraries, database files, Docker app data | Where apps store their persistent data |
| Backup data | Copies of important files or server configuration | Where recovery copies live if the main drive fails |
An internal SSD may be enough for a small test setup. For a long-term personal cloud, you may need larger drives, external storage, or a separate backup target.
Also remember that RAID, storage pools, or mirrored disks are not the same as a complete backup plan. They can help with drive failure depending on configuration, but they do not automatically protect against accidental deletion, app corruption, theft, or a mistaken format.
A Stable Local Network Connection
Your mini PC needs a stable network connection before it can act like a cloud server. For most beginners, wired Ethernet is easier to troubleshoot than Wi-Fi.
A stable local network matters because your first login, web dashboard access, file sharing, and remote access setup all depend on the server being reachable. If the server IP address changes constantly or the router cannot see the device, setup becomes much harder.
At minimum, you should know:
-
Which router or network the mini PC is connected to.
-
How to find the mini PC’s local IP address.
-
Whether you can reach the server from another computer on the same network.
-
Whether the server should use a reserved IP address later.
You do not need to expose the server to the public internet during the first setup. In many cases, it is safer to get local access working first.
A Way to Access the Machine During Setup
You need a way to interact with the mini PC while installing the system and completing the first setup. This may be a monitor and keyboard, or it may be SSH after the base system is installed.
For beginners, using a monitor and keyboard during installation is often simpler because you can see boot menus, installer prompts, and error messages directly. After the system is running, remote terminal access can be more convenient.
Prepare these items before starting:
-
A USB drive for the installer.
-
A keyboard and monitor, or a known remote access method.
-
Another computer for downloading and flashing the installation image.
-
A way to check your router’s connected devices.
-
A backup of any data currently stored on the mini PC.
Do not begin by formatting or installing over an old drive unless you are sure there is no important data left on it.
A Simple Setup Path for Your First Personal Cloud Server
A personal cloud server is easier to build when you treat it as a path instead of a single installation step. The Reuse-to-Cloud Setup Path is a practical model for turning an old mini PC into a working server.
| Framework Module | Main Question | What You Do |
| Hardware Reality Check | Is this mini PC still suitable for server use? | Check CPU, RAM, storage health, boot support, power, and network |
| Base System Foundation | What stable system will everything run on? | Choose and install a server OS or NAS-oriented system |
| Storage and Data Layer | Where will files, app data, and backups live? | Plan drives, mount points, file sharing, and backup locations |
| Access and Service Layer | How will the server become useful? | Add local access, apps, media, photo backup, Docker, or remote access |
| Validation and Upgrade Decision | How do I know it works, and when is it not enough? | Test login, storage visibility, app behavior, remote access, and limits |
This model helps prevent a common beginner mistake: installing an app first and only later realizing that the hardware, storage, network, or access method was never ready.
Step 1: Check Whether the Mini PC Is Still Suitable
Start by checking the machine before choosing software. This is the lowest-risk step because it helps you decide whether the project is worth continuing.
A practical check includes:
-
Does the device boot reliably?
-
Can you enter the BIOS or boot menu?
-
Can it boot from USB?
-
Is the internal drive healthy enough for an OS?
-
Does the network adapter work?
-
Can it stay powered on without overheating?
-
Is there enough storage for your planned use?
If the answer is unclear, start with a test installation or live USB environment before moving important files onto the machine.
Step 2: Choose the Right Server Operating System
Your operating system choice depends on how much control you want and how much setup work you are willing to handle.
Plain Linux can be flexible and long-lasting, but it may require more manual setup. A NAS-oriented system can be easier for storage, dashboard access, and app management, but it may come with its own hardware requirements and workflow.
For a beginner personal cloud server, the OS should help you complete three things:
-
Boot reliably on the mini PC.
-
Manage storage and network access clearly.
-
Run the apps or file services you actually need.
Do not choose an OS only because it looks easy in a screenshot. Choose it because it matches your hardware, your storage plan, and your willingness to maintain it.
Step 3: Create a Bootable USB Installer
Most old mini PC server projects start with a bootable USB installer. This lets you install or test the operating system on the target machine.
Ubuntu’s own USB creation tutorial explains that a bootable USB stick can be used to install or upgrade Ubuntu, test the desktop experience without touching the existing PC configuration, or repair a broken configuration. It also warns users to confirm the correct USB device because writing the installer will destroy existing data on that USB drive.
The general process is:
-
Download the operating system image.
-
Insert a USB drive large enough for the installer.
-
Use a trusted flashing tool or built-in USB creator.
-
Select the correct image and USB target.
-
Confirm that the USB drive can be erased.
-
Flash the installer.
-
Boot the mini PC from the USB drive.
Before flashing, check the USB target carefully. Accidentally selecting the wrong drive can erase data.
Step 4: Install the System and Complete First Login
After the USB installer is ready, boot the mini PC from it. You may need to enter the boot menu or adjust BIOS/UEFI settings depending on the system.
During installation, keep the first setup simple. Avoid adding too many apps or services before confirming that the base system works.
After installation, verify:
-
The system boots without the USB installer.
-
You can log in locally or through the expected interface.
-
The mini PC appears on your router or local network.
-
You know its local IP address.
-
Updates can be installed successfully.
This first login is the foundation for everything that follows. If the machine cannot boot consistently or cannot be reached on the network, do not move on to storage, apps, or remote access yet.
Step 5: Add Storage, Apps, and File Access
Once the base system is stable, add the storage and services that make it a personal cloud server.
For beginners, it is better to add one layer at a time:
-
Confirm the system drive works.
-
Add or mount extra storage.
-
Create a file sharing location.
-
Test file upload and download locally.
-
Add one app, such as photo backup or media streaming.
-
Confirm where that app stores its data.
-
Only then add more services.
This order matters because apps often depend on storage paths. If a drive is not mounted correctly, an app may store data on the system drive by mistake, or the data may appear to disappear after a reboot.
Step 6: Set Up Safe Remote Access
Remote access should come after the local setup works. It is tempting to expose a dashboard or service immediately, but that can create security problems.
If Docker is part of your setup, be especially careful with network-facing control interfaces. Docker’s remote daemon access guide warns that allowing remote clients to connect to the Docker daemon can expose the host to unauthorized access, and that insecure remote access can allow serious attacks if the connection is not secured properly.
For most beginner personal cloud setups, safer remote access usually means using a controlled remote access method rather than opening random ports directly to the internet.
Before enabling remote access, check:
-
Which service you want to access remotely.
-
Whether users need full server access or only file/app access.
-
Whether the connection is encrypted.
-
Whether authentication is strong.
-
Whether the exposed service is actually necessary.
-
Whether local access works first.
Remote access is useful, but it should not be treated as a shortcut around basic security.
What Can You Actually Run on an Old Mini PC Cloud Server?
An old mini PC can run many useful services, but the right workload depends on CPU, RAM, storage, network speed, and how many users or apps you expect.
For most beginners, it is better to start with one or two useful services instead of turning the machine into a crowded app server immediately.
File Sharing and Private Cloud Storage
File sharing is usually the first practical use case. You can create shared folders for documents, family files, projects, or device backups.
The key decision is whether the server is only for local network access or whether you also need remote access. Local file access is simpler. Remote file access needs more planning around identity, permissions, encryption, and exposure.
A private cloud storage setup should answer three questions:
-
Who can access the files?
-
Where are the files stored?
-
What happens if the drive fails or files are deleted?
If those questions are unclear, the setup is not ready for important data.
Photo Backup and Media Streaming
Photo backup and media streaming are common reasons to reuse a mini PC. They can be very useful, but they also create storage and indexing demands.
Photo libraries grow quickly. Media libraries can require more drive capacity and network bandwidth. If the mini PC is older, it may work well for lightweight streaming but struggle with heavy transcoding, large libraries, or many simultaneous users.
Start with a small test library before moving a full photo or media collection. This helps you confirm performance, storage layout, and backup behavior.
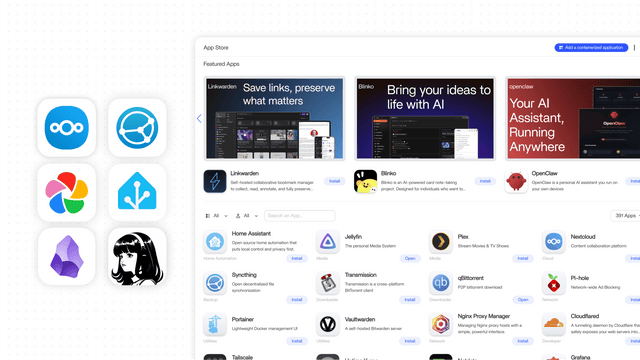
Docker Apps and Lightweight Self-Hosted Services
Docker can make it easier to run apps on a small server, but it also introduces new concepts: volumes, ports, container paths, host paths, permissions, and networks.
A lightweight Docker app can be a good next step after the base server is stable. However, do not assume Docker automatically protects your data. App data must be stored in the right location, backed up, and restored carefully if you move the server later.
Good beginner app types include:
-
Simple dashboards.
-
Lightweight file tools.
-
Photo management apps.
-
Media tools.
-
Small personal productivity apps.
-
Local network services.
Avoid adding many apps at once. If something breaks, it becomes much harder to know whether the problem is storage, networking, permissions, ports, or the app itself.
Common Mistakes That Cause Problems
Most beginner problems come from moving too quickly. The mini PC may be old, but the setup still needs the same basic discipline as any small server.
Treating the Mini PC Like a Plug-and-Play Cloud Box
An old mini PC does not automatically become a safe private cloud just because you install server software. You still need to plan storage, users, permissions, network access, updates, and backups.
This mistake often shows up when users install a dashboard first and only later ask where their files actually live. The dashboard is not the infrastructure. It is only one interface on top of the system.
Forgetting to Mount or Format Storage Properly
If a drive does not appear after installation, the issue may be the drive format, mount point, permissions, or whether the OS can see the disk at all.
Do not rush into formatting a drive if it contains data. First check whether the system detects it, whether it is mounted, and whether the file service or app has permission to use it.
A simple storage check should confirm:
-
The OS can detect the drive.
-
The drive has the expected capacity.
-
The filesystem is supported.
-
The mount point is stable after reboot.
-
Apps are storing data in the intended location.
-
Important data has a backup outside the active app path.
Exposing Services Remotely Before Securing Access
Remote access is one of the most useful parts of a personal cloud server, but it is also one of the easiest places to make mistakes.
Opening ports before understanding authentication, encryption, and service exposure can put the server at risk. For beginners, a safer path is usually to finish local setup first, then choose a remote access method that matches the user’s skill level and risk tolerance.
A personal cloud server should not be treated like a public website unless you are prepared to manage the security responsibilities that come with that.
Expecting Old Hardware to Handle Every Workload
Old mini PCs can be excellent for lightweight services, but they are not unlimited. A machine that works well for file sharing may not work well for heavy media transcoding, many Docker apps, large photo indexing tasks, or multiple users.
Use the old mini PC for the jobs it can handle reliably. If your needs grow into large storage pools, heavier backups, multiple drives, or always-on family storage, a dedicated NAS or newer server may become a better fit.
How to Check Whether Your Personal Cloud Server Is Working
A setup is not complete just because the installer finished. You need to verify the server from the user’s point of view.
Use this beginner validation checklist:
| Check | What Success Looks Like | What a Problem May Suggest |
| Boot check | The mini PC starts without the installer USB | BIOS, boot order, drive, or installation issue |
| Network check | Another device can reach the server locally | Router, IP address, firewall, or network adapter issue |
| Login check | You can access the dashboard, shell, or admin interface | Account, service, firewall, or setup issue |
| Storage check | Drives and folders appear where expected | Mount, format, permission, or drive health issue |
| File check | You can upload, download, and reopen a test file | Permission, share path, or app data issue |
| App check | One app runs and keeps data after reboot | Docker volume, storage path, or service issue |
| Remote access check | Remote access works only through the intended secure method | Network, authentication, DNS, VPN, or exposure issue |
| Backup check | A test file can be restored from a backup copy | Backup path, schedule, or recovery issue |
Do this before trusting the server with important files. A short test now can prevent much bigger problems later.
When an Old Mini PC Is Not Enough
An old mini PC is not always the right long-term personal cloud server. It can be a great starting point, but some situations call for a stronger or more storage-focused setup.
Consider moving beyond an old mini PC if:
-
You need multiple large drives.
-
You want a cleaner storage pool or RAID workflow.
-
You need better drive cooling or hot-swap access.
-
You are storing family or team data that must be easier to recover.
-
You need heavier media, photo, AI, or Docker workloads.
-
You want a system built more specifically around NAS-style storage.
The decision is not “old mini PC or nothing.” A reused mini PC can help you learn the workflow. Later, you can move to a dedicated NAS, a newer home server, or a more storage-heavy setup if your data becomes more important or more complex.
How to Move From Concept to Configuration
After you understand the general setup path, the next step is choosing a real system and following its device-specific installation process.
A NAS-oriented system may have its own image, USB flashing process, boot requirements, first-login method, storage tools, and app workflow. For example, the ZimaOS installation guide describes one x86-64 NAS-oriented path that includes downloading an image, creating a bootable USB drive, checking UEFI and Secure Boot settings, installing the system, and accessing the web interface after reboot.
That kind of device-specific guide is useful after you already understand the general concept. It should not replace your own readiness checks, storage plan, backup thinking, or remote access decisions.
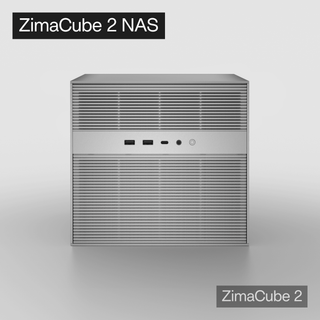
For users who are moving from a reused mini PC experiment toward a storage-heavy private cloud or home NAS setup, ZimaCube 2 personal cloud NAS fits the type of scenario where file sharing, photo backup, media libraries, storage pools, and remote file access become central parts of the workflow. It is not the only possible path, but it is a clearer device category when the project grows beyond a small reused machine.
The practical next step is to match the system to your use case:
-
If you are testing and learning, keep the setup small.
-
If you are storing important files, design the backup first.
-
If you are adding apps, confirm where app data lives.
-
If you need remote access, secure it before relying on it.
-
If the mini PC becomes the bottleneck, move the workload to a better-suited device.
FAQ
Can I turn any old mini PC into a personal cloud server?
Not every old mini PC is a good candidate. It should be able to run a stable server OS, boot reliably, connect to the network, and provide enough storage for your use case. If the device overheats, has failing storage, or cannot boot from USB, it may not be worth using for important data.
Do I really need a NAS operating system, or is plain Linux enough?
Plain Linux can be enough if you are comfortable setting up storage, file sharing, apps, users, and updates yourself. A NAS-oriented system can make some tasks easier by providing a dashboard, storage tools, and app workflows. The better choice depends on whether you value control and flexibility more, or a more guided setup experience.
Is 25GB of storage enough for a personal cloud server?
It may be enough for a system installation or a small test setup, depending on the operating system, but it is not enough for a real personal cloud with photos, backups, media, and app data. Treat small storage as a starting point, not a long-term plan. For real use, plan separate space for active files, app data, and backups.
What happens if my drives do not appear after installation?
The drive may not be mounted, formatted, supported by the OS, or visible to the app or file service. First check whether the operating system can detect the drive before changing anything. Do not format a drive that may contain important data until you understand what the system is seeing.
Should I use a mini PC, a NAS, or a dedicated home server for private cloud storage?
Use a mini PC if you want to learn, reuse hardware, and run light personal services. Use a NAS-style device if storage, backups, file sharing, and media libraries are the main goal. Use a dedicated home server if you need more compute, virtualization, multiple apps, or heavier workloads.

Recommended products
Support & Tips
More to Read
How to Deploy a Local LLM Without Breaking Storage or Apps
This guide explains how to safely deploy a local LLM on a shared home NAS or home server. It covers model storage paths, Docker...
What to Check Before Adding a GPU to a Home NAS
This guide explains what to check before adding a GPU to a home NAS. It covers workload fit, PCIe slots, physical clearance, PSU headroom,...
What Are the Local AI Limits of a Home NAS?
This guide explains the local AI limits of a home NAS by workload type, hardware resources, and real-world impact. It covers OCR, media analysis,...


